Animated SVGs add motion to a website while staying sharp at any size and keeping files light, which makes them a strong fit for logos, icons, and accents that need to feel alive.
In Framer, the website builder, you can add them several ways, from no-code components to a custom code component. Which method fits depends on how complex the animation is and how much you want to touch code. This guide walks through each one, with a quick framework for picking the right method.
Table of contents
1. Which SVG animation method should you use in Framer?
2. Method 1: Bring in pre-animated SVGs from an external tool (no code)
3. Method 2: Animate SVGs with Framer's native tools (no code)
4. Method 3: Drop in an SVG component from Framer Marketplace (no code)
5. Method 4: Add a Lottie animation in Framer (low code)
6. Method 5: Build custom SVG animations with a Code Component (code)
7. Why your animated SVG stops moving when you upload it to Framer
8. Final thoughts
Key takeaways
- Animated SVGs stay sharp at any resolution while keeping files light, making them a strong fit for logos, icons, and accents
- Framer offers five ways to add SVG animation, ranging from no-code to low-code and full code
- Uploading an animated SVG as an image breaks it because Framer reads only the first frame and never runs the file's CSS or JavaScript, so the artwork shows, but the motion dies.
Which SVG animation method should you use in Framer?
Before getting into steps, it helps to match the method to your project. The methods line up from the simplest to the most capable, and most need no code at all.
Framer can animate simple SVGs on its own: its built-in tools draw a logo or react to hover, and a ready-made Marketplace component drops a finished effect onto the page.
Framer is not a full animation editor, though, so anything elaborate, a morph, a layered scene, a custom sequence, is better built in a dedicated tool like SVGator and brought in as a finished file.
| Animation goal | Tool options | Best for |
| Draw a logo or icon outline | Framer's native Stroke effect or a Marketplace component | Quick stroke effects |
| Loop an accent or hover reaction | SVG export with baked-in interactivity from SVGator, or Framer Variants | UI micro-interactions |
| A complex, multi-part animated SVG | Build it in SVGator, then embed the file | Production-ready motion |
| Dense, illustrative motion | Build in SVGator and export as Lottie, or Framer's Lottie component | Detailed animated scenes |
| Fully custom paths and triggers | Our Player API or Framer Motion (code component) | Bespoke interactions |
As for format, SVG handles the majority of web animation cleanly, since it is scalable, lightweight, interactive, and stays sharp at any resolution. Lottie is the stronger pick when the motion is complex and illustrative. A GIF only makes sense as a last resort, because it is heavier and caps the quality.
Method 1: Bring in pre-animated SVGs from an external tool (no code)
When the animation is more involved than a single drawing path, the cleanest approach is to build it in a tool made for SVG animation, then embed the finished file in Framer.
SVGator is a browser-based option built for exactly this, and its output is self-contained, which matters once the file lands on a live site.
Create your animation in SVGator
SVGator runs in the browser, so there is nothing to install.
- Start a project by importing an existing SVG, using one of the templates, or designing one on the canvas, and if your artwork lives in Figma, SVGator’s plugin brings it straight in.
- Add animators, such as position, rotation, scale, opacity, path drawing, or morph, and set keyframes on the timeline.
- Pick an interactivity trigger if you want one: on load, on hover, on click, or on scroll into view.
Export as a self-contained SVG
SVGator’s export panel offers two animation types for a single SVG file.
CSS export produces the smallest file and needs no runtime, so it is a strong default for straightforward motion like loops and transforms.
JavaScript export supports the full set of effects, including morphing and path drawing, and embeds a lightweight player inside the file itself.
Either way, you end up with one dependency-free, browser-native file and no separate player library to load, which keeps the result production-ready.
How to create an SVG animation in SVGator
Embed it in Framer (the right way)
The key is to embed the code, not upload the file as an image.
- Open the exported .svg in a plain text editor and copy everything inside it.
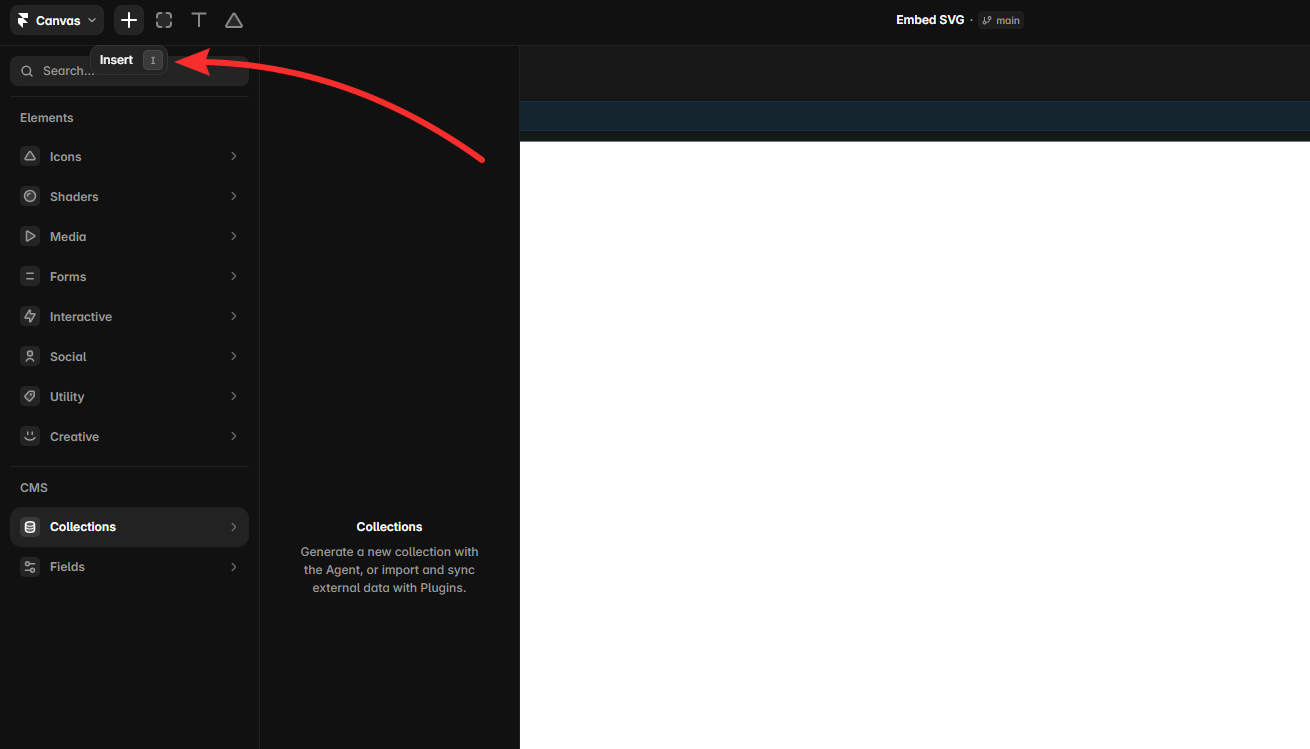
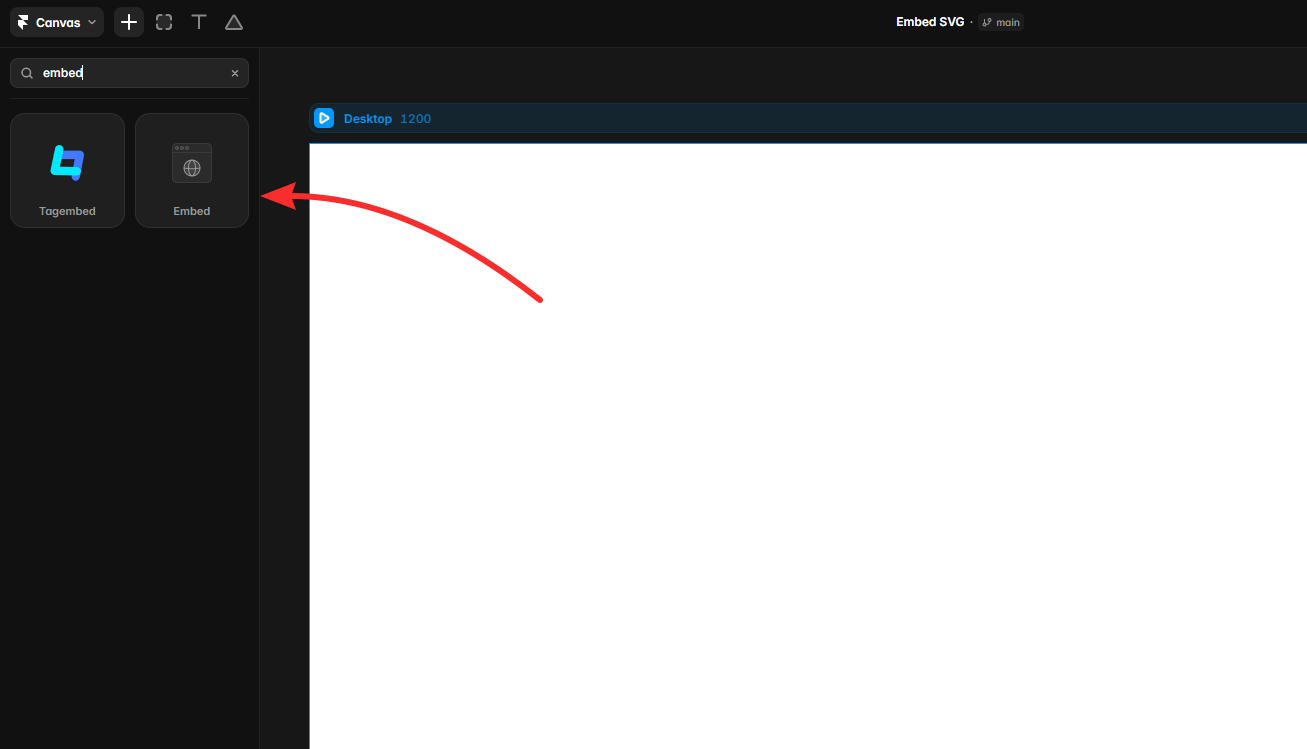
- In Framer, open the Insert menu, search for Embed, and drag the Embed component onto the canvas.
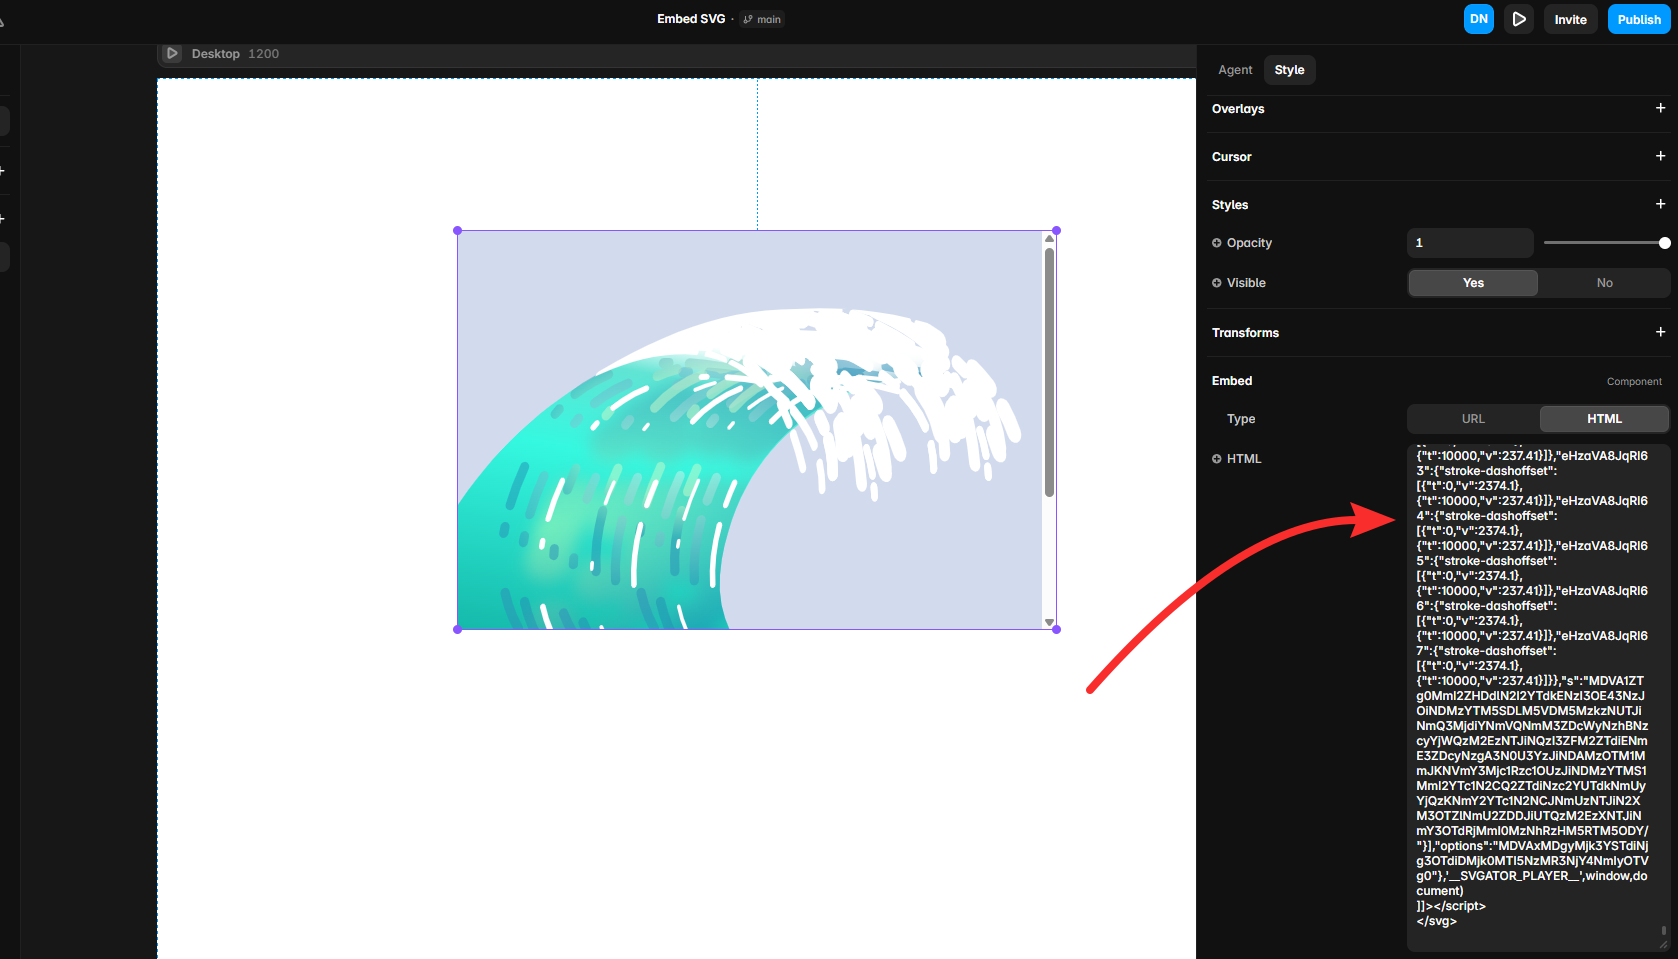
- Switch the component to the HTML tab and paste the full SVG code.
- Size the component to match your animation, then preview to see it play.
If you exported with the responsive option, the animation scales to the component’s width, while a fixed-size export needs a component set to the same dimensions to avoid clipping or scrollbars.
Method 2: Animate SVGs with Framer’s native tools (no code)
Framer ships with enough built-in motion to animate an SVG. The trade-off is that these tools shine on focused effects, a line that draws itself or a shape that shifts between states, rather than elaborate multi-layer sequences.
Import your SVG as a Vector Set
When you drag an SVG file onto the canvas, Framer converts it into a Vector Set, a grouped collection of the shapes and paths inside the file. You can also draw one from scratch through the Insert menu’s Vector option.
Lean icon files tend to import as clean, editable vectors, while heavier files with embedded images can arrive as a single graphic, so keep your source file lean.
- Open the Insert menu, or drag the .svg file straight onto the canvas.
- Let Framer build the Vector Set automatically from the file.
- Double-click the set to edit individual paths, recolor them, or move points.
Stroke effect
Framer’s stroke effect produces the self-drawing look, where a path animates from empty to fully drawn. Under the hood it animates the length of the line, so the shape appears to draw itself on smoothly, and you can loop it or tie it to a trigger.
- Select your vector layers and create a vector set from them.
- Open the effects section in the properties panel and add the stroke effect.
- Adjust length, gap, and offset to control how the line draws.
- Preview the animation to check the timing before you move on.
Animate states with Variants and Smart Animate
For motion between two looks, an icon that nudges on hover or a menu that shifts open, component variants do the job.
- Turn your SVG into a component and add a second variant with the changed state.
- Connect the variants with a hover or click trigger, and Framer animates between the matching layers on the transition.
Method 3: Drop in an SVG component from Framer Marketplace (no code)
The lowest-effort path skips setup entirely. The Framer Marketplace hosts components built specifically to animate SVGs, so you drop one onto the canvas, feed it your file, and adjust a few settings.
The SVG animation components worth knowing
A handful of components cover the most common effects:
- Line Draw SVG: animates a path drawing on scroll or on a timer
- SVG Morph: transitions one shape smoothly into another
- Animated SVG Beam: sends a moving beam tracing along a path
- SVG Reveal on scroll: draws a path as the visitor scrolls down the page
- SVG Path Carousel: moves a set of items along an SVG path
Availability and pricing vary, with some free and some paid, so check each listing before you commit to one.
How to add and customize a Marketplace component
- Open the component’s Marketplace page and add it to your project.
- Drop the component onto the canvas where you want the animation to sit.
- Select it, then upload your SVG or paste your path in the properties panel.
- Adjust the settings the component exposes, such as color, stroke length, direction, and trigger.
- Preview to confirm the motion plays the way you expect, then place it like any other layer.
Method 4: Add a Lottie animation in Framer (low code)
Some animations are too dense for a path effect, think a detailed character or an illustrated scene with many moving parts. That is where Lottie fits. It is a lightweight, JSON-based vector format that Framer reads through a built-in component.
When Lottie is the right choice
The real decision is the trade-off. Lottie keeps intricate, multi-part motion intact, but it needs a player to render, so you give up the single-file, no-dependency quality that a plain animated SVG offers.
For a clean geometric effect, SVG stays the lighter choice, for a rich animated scene, Lottie earns its place.
How to add a Lottie file to Framer
- Open the Insert menu and add the Lottie component, found under Media, to the canvas.
- In the properties panel, point it at your file by URL or upload the JSON directly.
- Set playback options like autoplay, loop, and speed, then preview the result.
Method 5: Build custom SVG animations with a Code Component (code)
The most flexible route is a code component, a small block of React that animates the SVG directly. It gives the finest control over every path, easing curve, and trigger, and Framer does some of the heavy lifting because its animation engine, Framer Motion, is built in.
The trade-off is that it calls for React, so it usually means working with a developer rather than staying on the canvas.
Set up a Code Component for SVG
A code component holds the SVG markup plus a few animation settings. A developer creates it in the Code section of the assets panel, gives the paths names to target, and Framer previews the result live on the canvas as they edit, so there is no need to publish the site to see it play.
Animate an SVG path with Framer Motion
The classic effect is drawing a path, where the line animates on from empty to full. Framer Motion handles this through a path-length value that runs from start to finish, the same self-drawing look as Framer’s native stroke effect, but with control over every detail of the timing and easing.
Plain CSS keyframes cover the simplest cases, and for a heavier timeline a developer can reach for a dedicated animation library, though Framer Motion covers most of the work on its own.
Add hover, click, and scroll triggers
Framer Motion has gestures and viewport detection built in, so a developer can start the animation on hover, on click, or when the element scrolls into view, and combine those triggers for richer interactions.
This is the layer that makes a code component worth the effort, a behavior too specific for the no-code routes to reach.
Why your animated SVG stops moving when you upload it to Framer
Why Framer strips the animation
When you drag an animated SVG onto the canvas or upload it as an image, Framer treats it as a static graphic and reads only the first frame, so the animation disappears. This trips up a lot of people, because the file plays fine when opened directly in a browser but sits motionless in Framer.
The animation code is still inside the file. Framer’s image import simply renders the artwork and never runs the CSS or JavaScript that drives the motion, which is why the result looks frozen.
The fix: embed instead of upload
The fix is to embed the animation rather than upload it as an image.
- For a finished animated SVG, use the Embed component and paste the SVG code into its HTML tab, as covered in Method 3. The Embed runs the file’s CSS or JavaScript, so the motion plays.
- For a fully custom build, a developer can recreate the animation in a code component, as covered in Method 5.
Either way, the rule is the same: an animated SVG has to run as a live file, not sit as a flat image. Uploading preserves the look but kills the motion, while embedding preserves both. If an embed still looks static, double-check that you pasted the full SVG code into the HTML tab rather than linking the file as an image.
Final thoughts
The right method comes down to how complex the animation is. Simple drawing effects and state changes sit well within Framer’s no-code tools and Marketplace components, dense illustrative motion suits Lottie, and anything elaborate is best built in a dedicated tool and embedded as a single self-contained file.
SVGator gives you a visual timeline, interactivity presets, and one dependency-free file that drops into Framer’s Embed component. For designers who want to ship polished, animated sites without handing the work to a developer, it keeps everything in one place, from first keyframe to final export.