Are you a beginner trying to create your first animation in SVGator, or a seasoned pro who is already mastering the art of morphing? Regardless of your current level, we guarantee that this article will help you become even more productive.
We asked those who know best how to speed up their workflow: SVGator’s design team, including the founding members. Find out about their best practices and get the most out of SVGator!
1. Reuse animated elements
Working on several projects at the same time may seem a bit overwhelming, but the good news is that you don’t have to start your projects from scratch all the time.
You can choose from a constantly-growing library of premade assets, and you can also create your own assets in order to use them in future projects. All you have to do is to right-click on your group or element, then choose the Save to Library option.
And just like that, you have new assets ready to use whenever you want! This trick works with both static and animated elements, so you’ll get unlimited creative freedom without investing too much time into the design process.
2. Use snapping tools
Drawing, sizing, and positioning elements on your canvas wouldn’t be the same without a time-saving and super useful feature — namely, snapping. By using snapping tools, you’re able to seamlessly align your artwork with the least effort.
In SVGator, you can simply enable snapping with a single click or a shortcut (Alt+S), and then choose from five different options. The tool allows an object to be easily positioned in alignment with another object, points, guides, grids, or pixels. Your element will automatically jump to an exact position when the user drags it to the proximity of the desired location. Sounds easy and familiar, right?

3. Use multiple elements in a single mask group
Masking offers countless creative possibilities by allowing you to show or hide any portion of an element and play with the transparency level of your objects. When used in the animation process, it has even more creative potential, especially when using multiple elements under the same mask group.
When you create a mask for your object in SVGator, a new group is automatically created in your list of elements. Then you are not only free to animate your mask, but you can also add more elements and subgroups to it anytime you want. Basically, all elements brought together under your mask group will act like a mask and can be animated separately.
Take the example below, where the wings and the body of the dragonfly are all parts of the same mask group and they are animated differently. If you want to learn more about animating clipping masks, check out this tutorial.
4. Learn shortcuts
Have you ever thought about how much time you can save by regularly using keyboard shortcuts? According to a study, most people lose an average of 2 seconds per minute of work due to not learning shortcuts, which leads us to a total of 8 work days per year. Now you can understand why it is essential to learn shortcuts in order to boost your productivity, speed up your workflow, and save 8 work days' worth of time each year.
If you want to check all the shortcuts in SVGator, go to the main menu and choose Help - Keyboard Shortcuts. Of course, there is a shortcut for this one, too: press F1, and you get the whole panel.
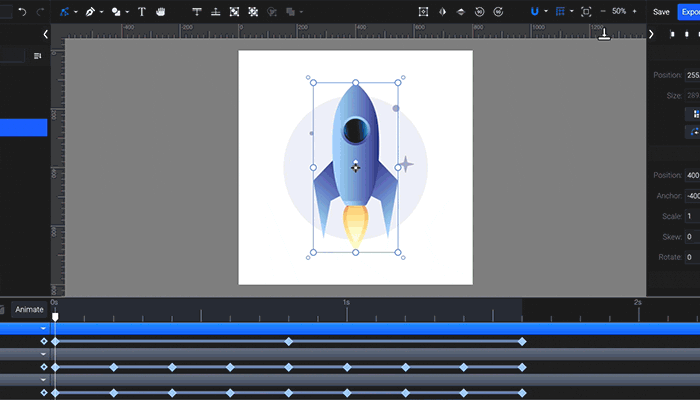
Below you will find the hotkeys to animators that you might use most often. These also create new keyframes for existing animators:
✔️ Shift+P: Position
✔️ Shift+O: Opacity
✔️ Shift+R: Rotate
✔️ Shift+S: Scale
Other useful shortcuts:
✔️ Ctrl + D: duplicate element or keyframe
✔️ Shift+Arrow keys: nudge 10 units instead of 1
✔️ Middle click on mouse + Drag in stage: pan around
1: fit and center canvas to stage
2: fit and center a selected element to stage
✔️ Double click nodes to switch between smooth and straight node types
✔️ Alt+scroll: zoom-in timeline
✔️ Shift+Space: go back to the beginning of the timeline
✔️ Alt+scroll = zoom
✔️ Shift+drag keyframes to move them in smaller increments
5. Swap animated group elements
Have you created a nice animation, and you want to use the same effects but with different elements? Try this next trick to save a lot of your precious time and effort.
All you have to do is to animate groups instead of elements so that later you can replace these elements with others, which will keep the same animation effects once placed in the group. Save your group to the library as an animated asset, which will ensure that you can also use it later when you will need it. Then you will also be able to change its elements again when you need a new project with the same animation effect.
6. Use guides and grids
Guides and grids are essential to any graphic tool, as they help you position and align your elements precisely. Use multiples of 10 and 100 for canvas and element sizes where possible, so you benefit from the subdivisions offered by the grid. As you zoom into your project, the grid gets subdivided by 10, allowing you to control both the big picture and fine details. You can nudge elements by a grid unit with the arrow keys, and nudge elements by 10 grid units with Shift + arrow keys.
7. Create a perspective illusion
You might want to create the illusion of an object viewed from an angle, like the drone’s propellers in the example below. This is also possible in SVGator; you just need to follow the steps below:
- Draw the propeller as you view it from a top view (X shape).
- Apply a rotation animation on it (e.g., 360 degree or 1 turn).
- Then with the animated propeller selected, right click and choose Group (or ctrl + G or cmd + G on Mac).
- You should now have the propeller inside a group.
- Apply a scale transform on the Y axis on the group, and press play.
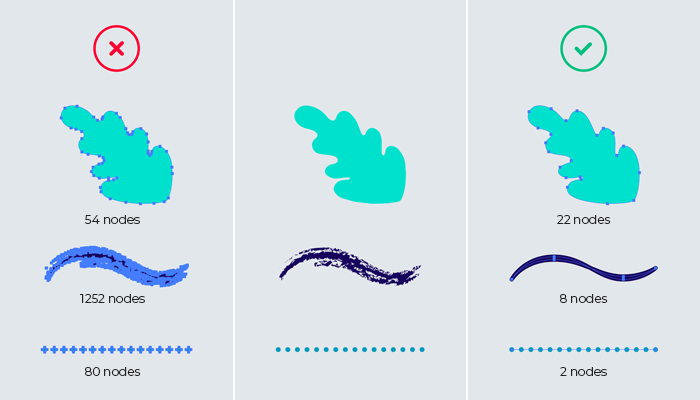
8. Optimize your graphics
If you plan to import your SVG created in other tools (for example, Illustrator), make sure you use a simplified path, and avoid setting your Pencil or Brush tools to Accurate. This creates a lot more nodes than necessary to describe a path and will affect your file size. When you need a dotted line, use a path instead of creating a huge number of individual circles.
Be cautious with textured brushes too, as these will also turn your simple elements, which would normally have 3-4 paths and 20 points, into hundreds of paths and thousands of points - and this can seriously affect your file size. When you have a complex vector illustration that ends up having 500.000-2.000.000 points or curves, your SVG might not be as light as you expect it to be, which is why it is essential to optimize your graphics.
9. A few more short tips
- If you would like to work with 2 projects at once, you can do this in 2 separate tabs
- You can hide panels and expand or zoom to the timeline in order to check all your keyframes.
That’s all for today, we hope that these tips will help you to better your animation skills and get the best results from SVGator. If you have any questions, don’t hesitate to reach out to us at any time!