Design teams increasingly want motion to be part of the interface from the earliest stages, not something added at the end of the process. When animations are created separately from design tools, however, workflows often become fragmented, requiring repeated exports, adjustments, and manual handoffs between designers and developers.
The SVGator Figma Plugin makes it possible to animate Figma assets directly in SVGator, while keeping design and animation connected throughout the entire workflow.
Table Of Contents
What Is The SVGator Figma Plugin
How To Install And Set Up The Plugin
Prepare Figma Designs For Clean Animation
SVG Export Settings Affect The Animation Result
How To Bring Animations To Figma
How Developers Access Animation Files
Common Issues And How To Fix Them
Choosing The Right Export Format
What Is The SVGator Figma Plugin
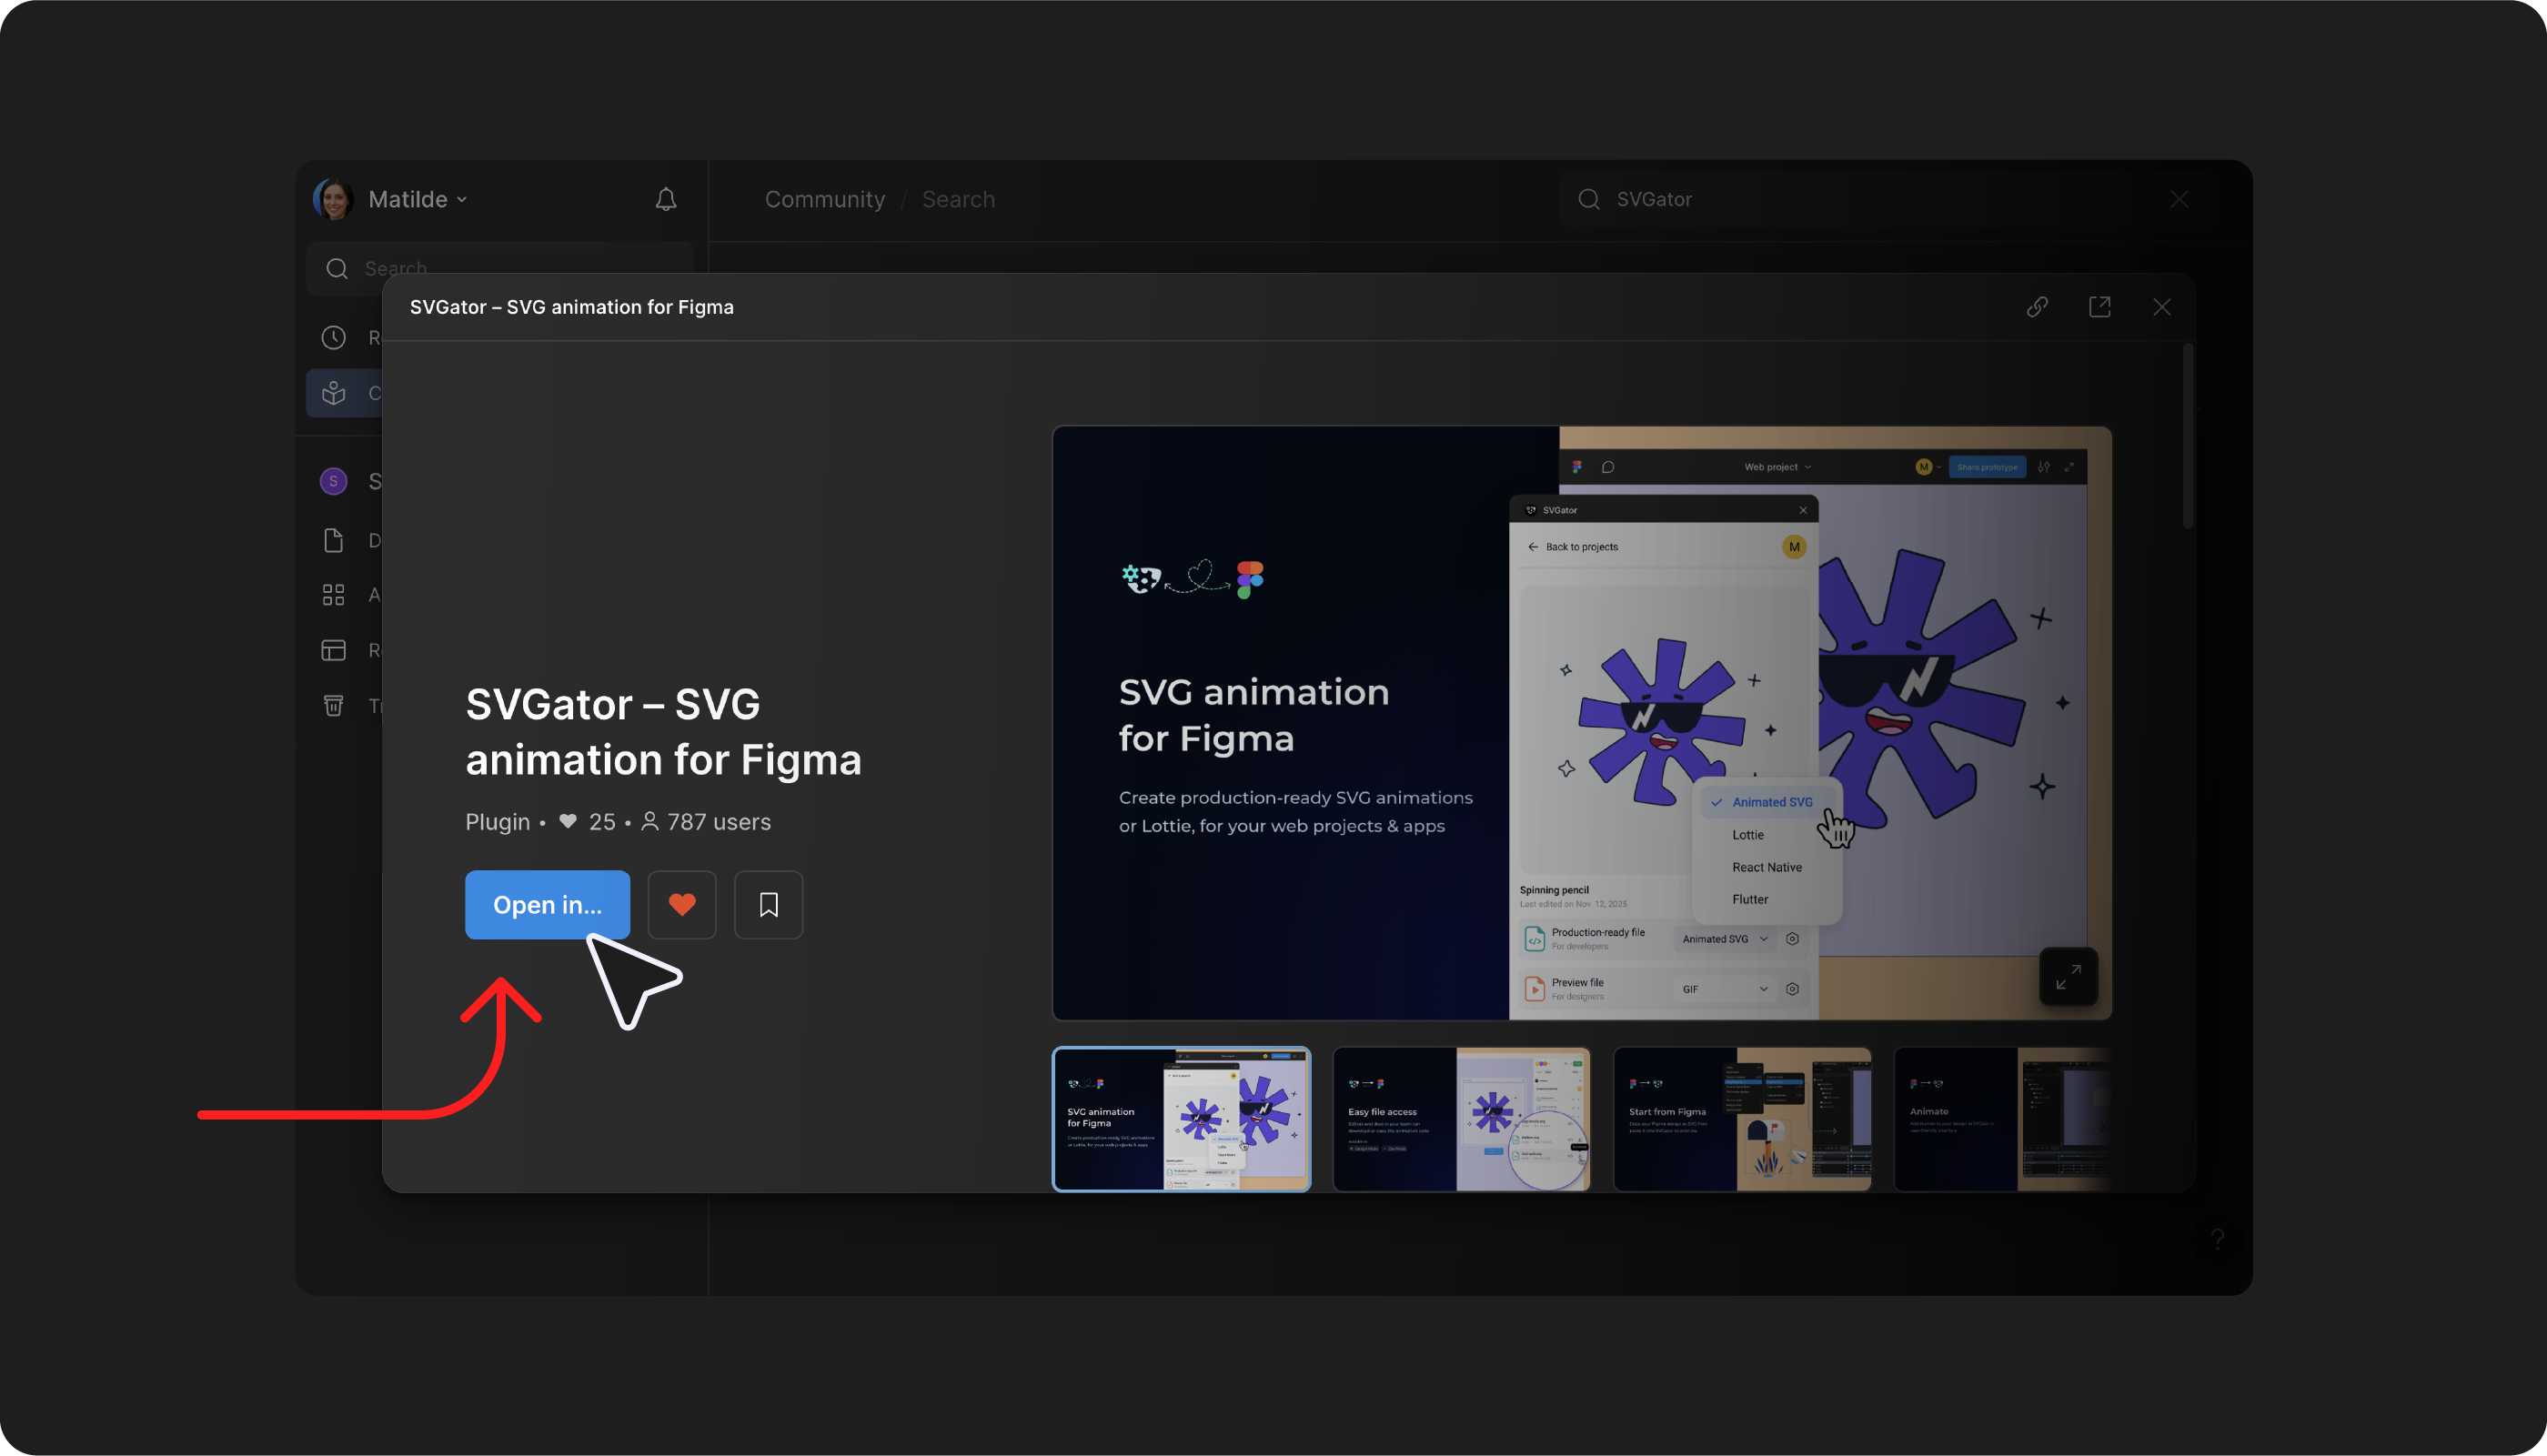
The SVGator Figma Plugin is a free integration that connects SVGator and Figma within a single workflow. Instead of exporting files, importing them into another tool, and manually passing assets between teams, designers can move directly between design and animation without breaking context.
The plugin allows users to access their SVGator projects from inside Figma and insert animation files that are ready for production. These can include animated SVG files, Lottie exports, or files prepared for React Native and Flutter environments. It also enables the generation of preview assets such as GIF or MP4 files, which are useful for prototypes, presentations, and stakeholder reviews.
The plugin works with any SVGator account, whether free or paid. Developers do not need their own SVGator account when they only need implementation files, as production-ready exports can be downloaded directly from Figma when Edit access to the project is available.
How To Install And Set Up The Plugin
Follow these steps to install and connect the SVGator plugin inside Figma.
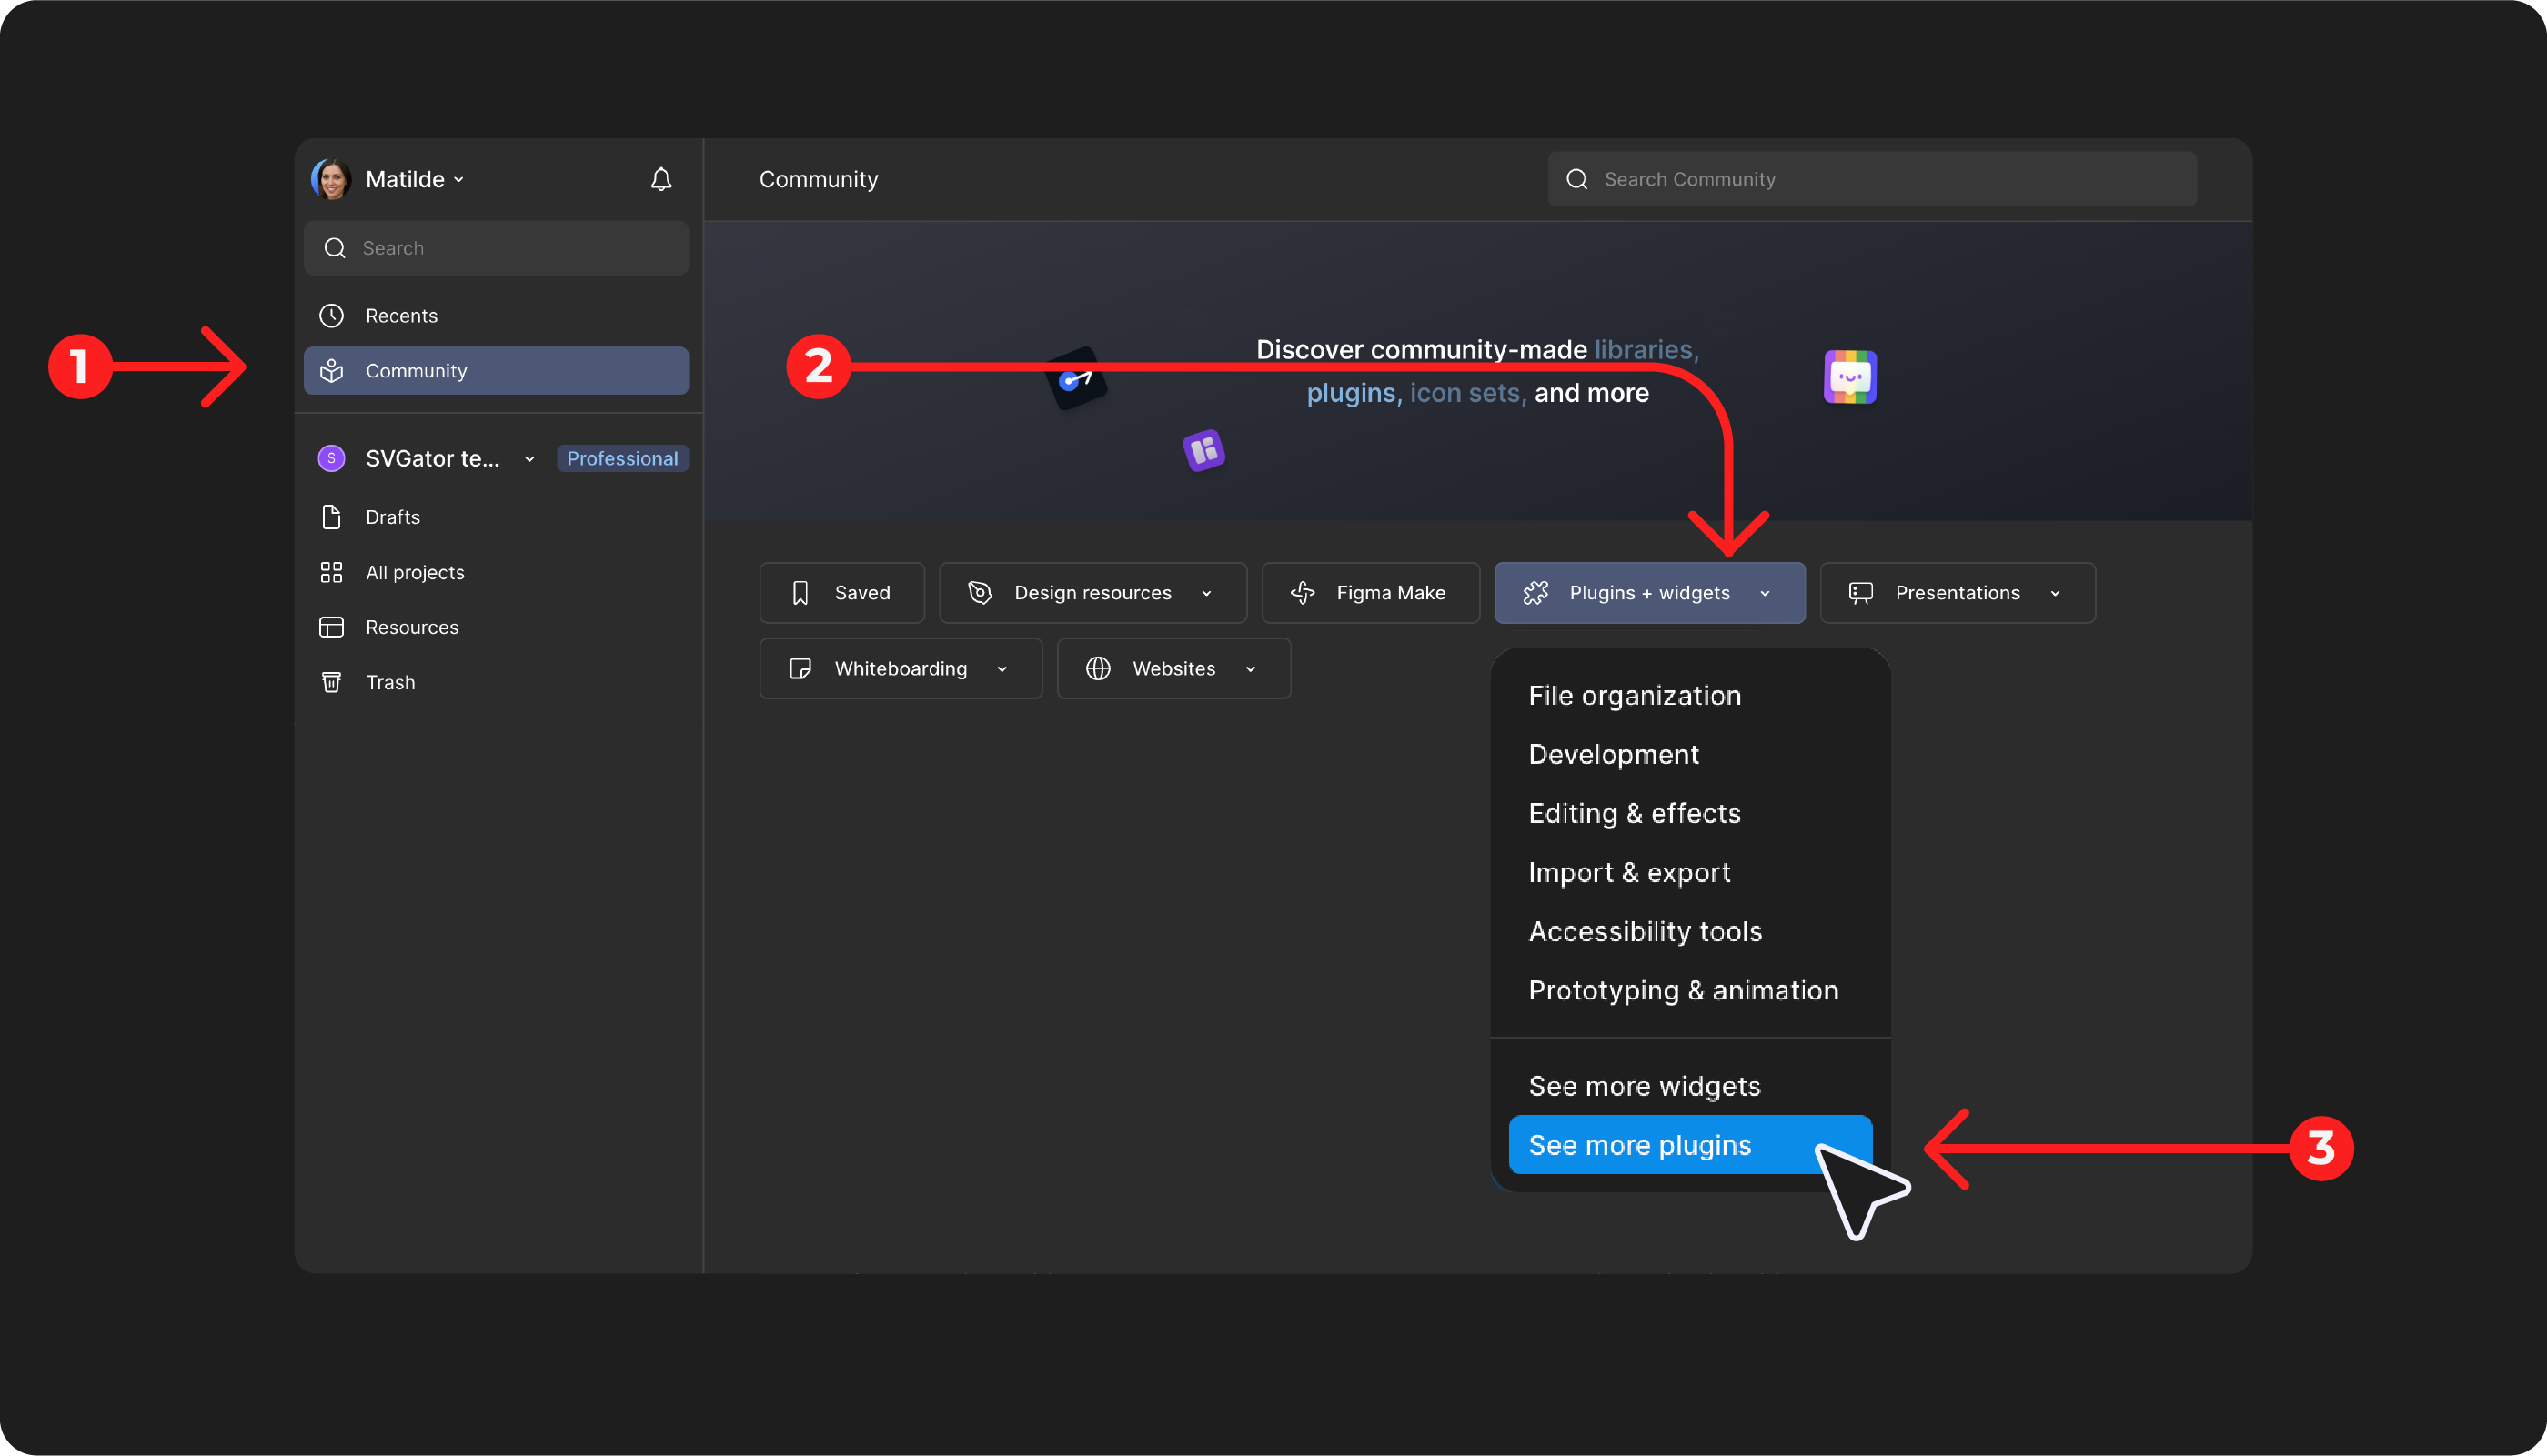
- Open Figma and go to Community, then navigate to Plugins and Widgets and select See more plugins. Use the search bar to look for “SVGator” and install the plugin from the results.
- If you are already working inside a Figma file, open the main Figma menu, go to Plugins, choose Manage plugins, search for “SVGator”, and run it directly. After installation, the plugin will also appear in the Actions panel for quick access.
- Launch the plugin and click the Log in button. A browser window will open where you need to confirm access by selecting Authorize, allowing the plugin to connect to your SVGator account.
- Once authorisation is completed, the plugin will display your SVGator projects, renders, and any projects shared through your SVGator Team, making them available directly inside Figma.
- If you do not yet have an SVGator account, create one through the sign-up form before logging in, then return to Figma to complete the connection.
Prepare Figma Designs For Clean Animation
The quality of any animation depends largely on how the original Figma file is organised before it reaches SVGator. A well-structured file results in predictable timelines and easier animation control.
Layer naming is essential because every layer name transfers directly into SVGator’s timeline. Names should describe the element itself rather than its position in the layout, making animation layers immediately understandable. Clear naming reduces confusion once multiple animated elements are involved.
Elements that need to move together should be grouped logically. For example, a button composed of background, icon, and label should exist as a group so that it can be animated as a whole or adjusted at a child level when needed. Boolean operations should be flattened before export, as unions or intersections may not translate reliably into SVG structure.
Text elements require particular attention. Converting text into outlines prevents font rendering inconsistencies and allows individual characters to be animated if necessary. Hidden layers should also be reviewed carefully since they can still appear after export. Visual effects such as blurs, shadows, or blend modes should be reduced or replaced, as these effects are not consistently supported within SVG environments.
How To Import Figma Designs To SVGator
Bringing Figma designs into SVGator takes just two simple steps:
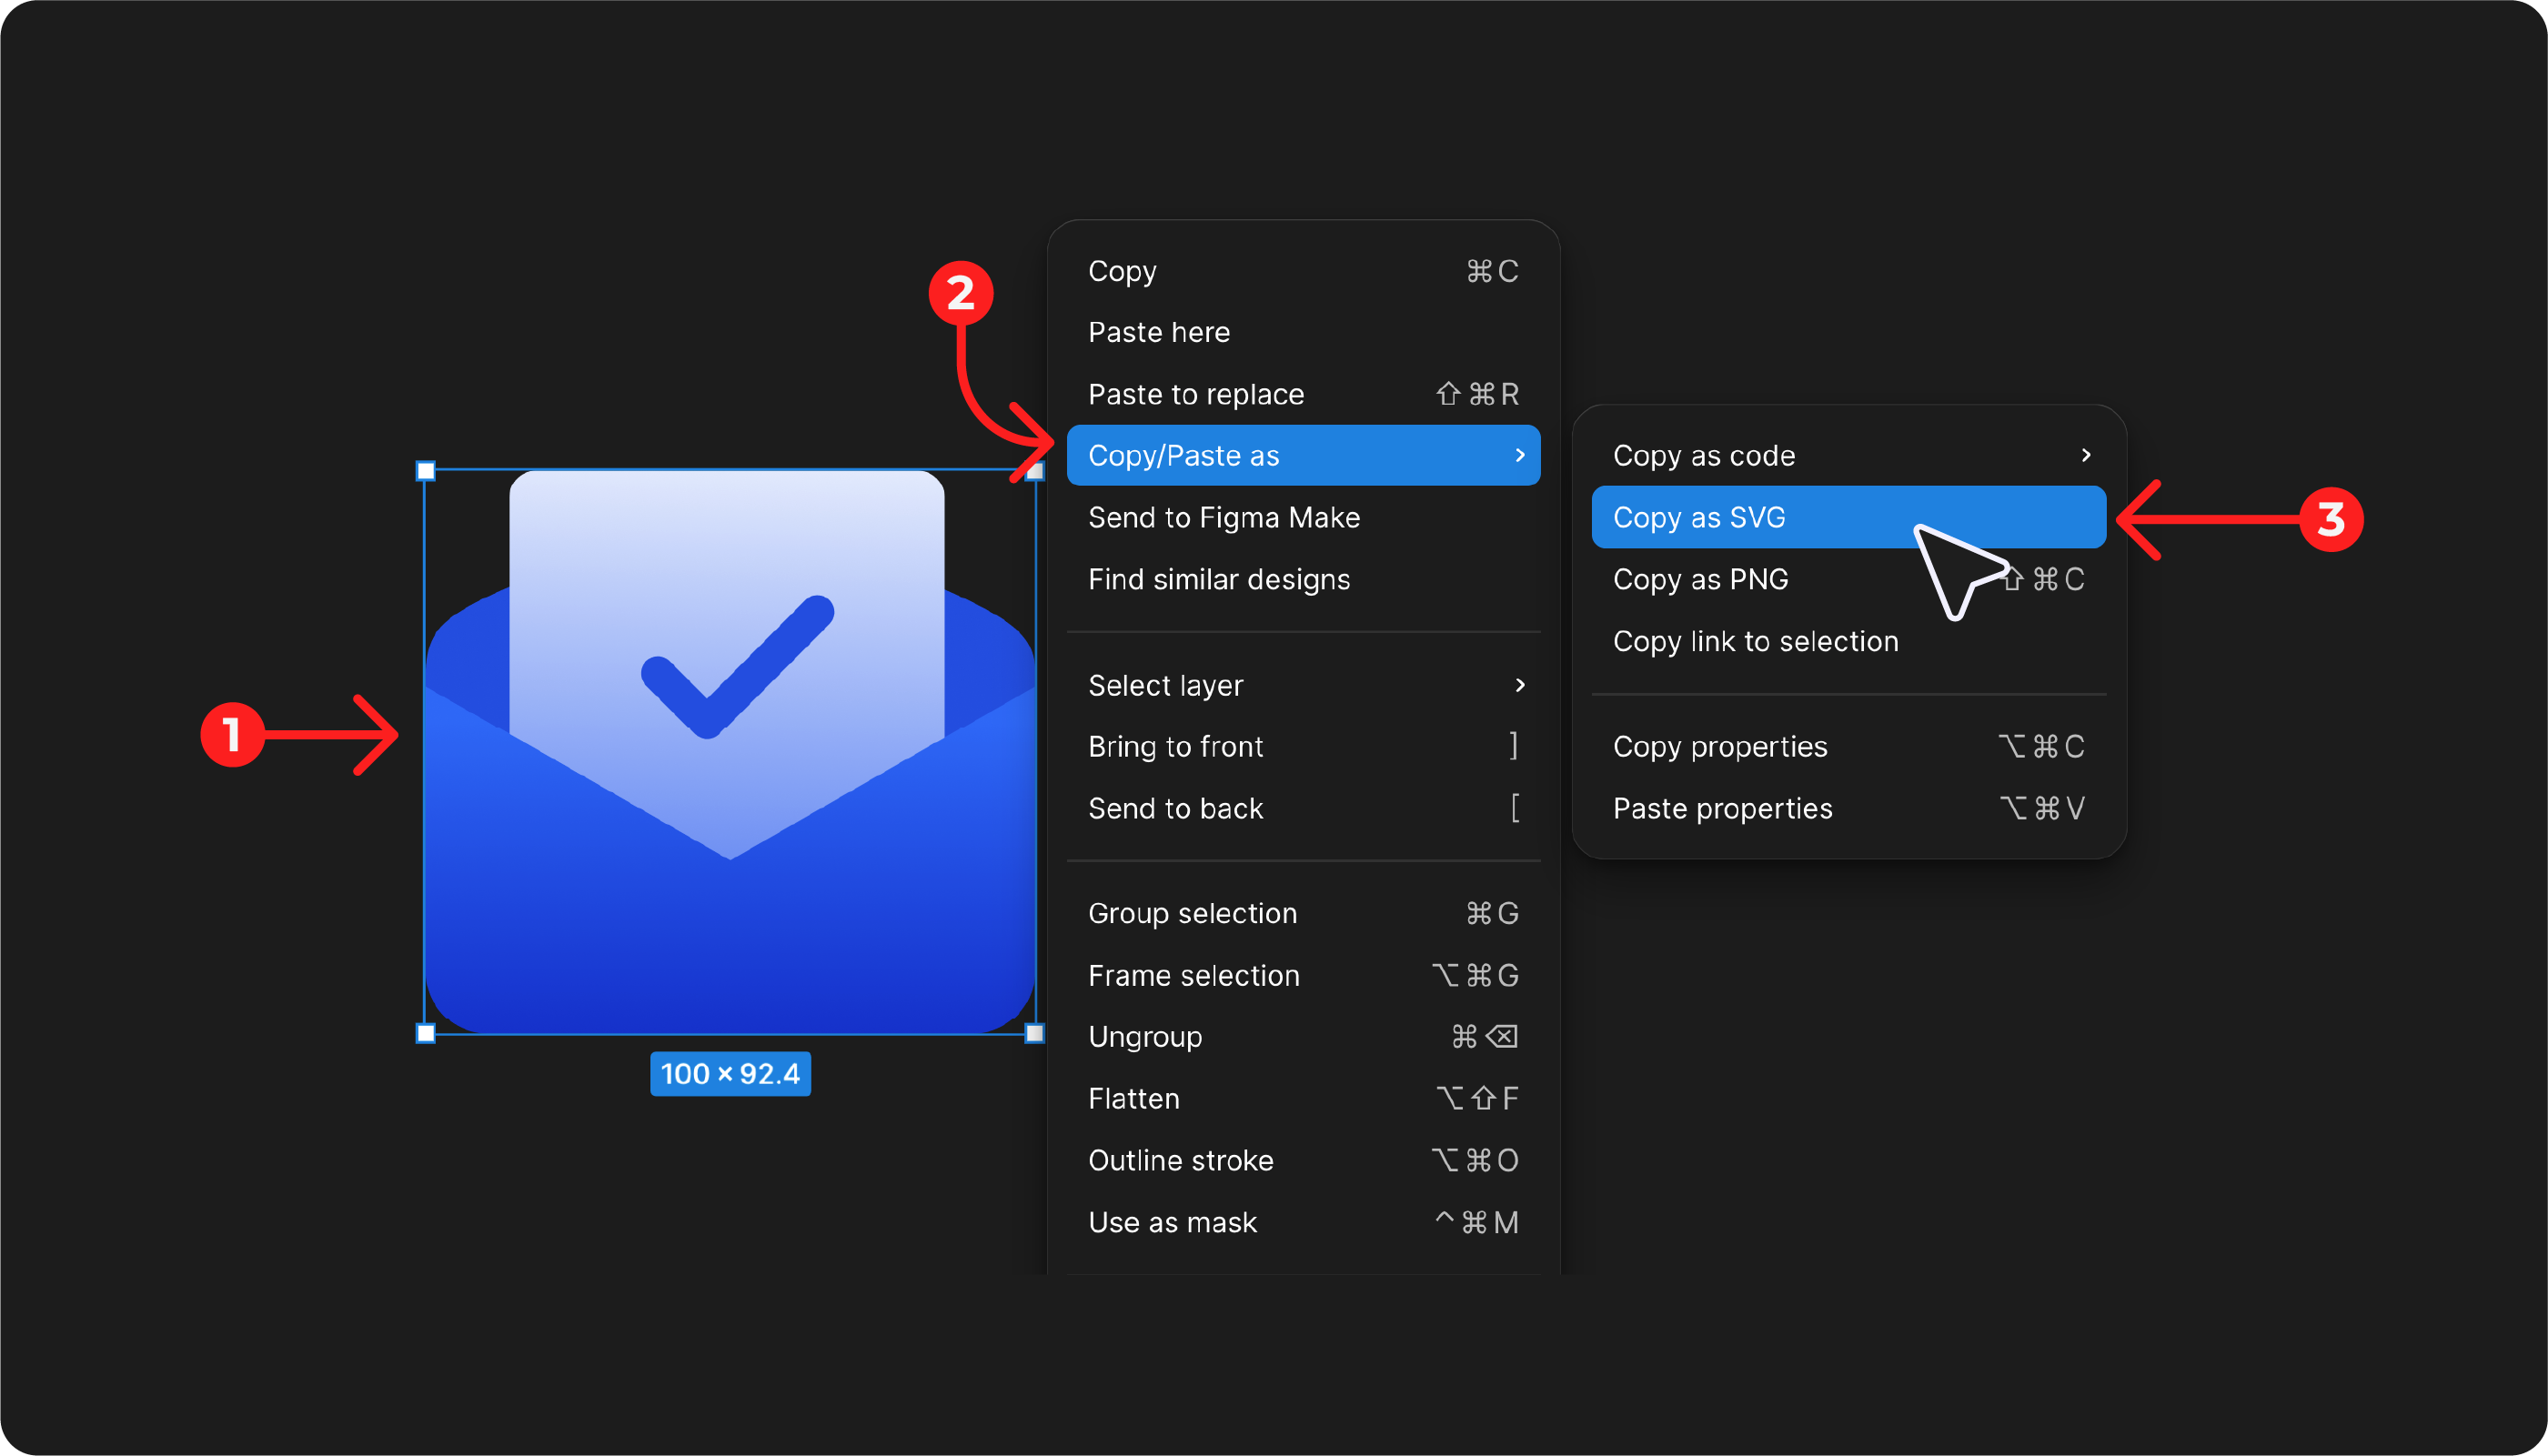
Copy The SVG From Figma
Select the element you want to use in Figma, right-click it, and choose Copy → Copy as SVG. This ensures the vector data is preserved and ready for animation.
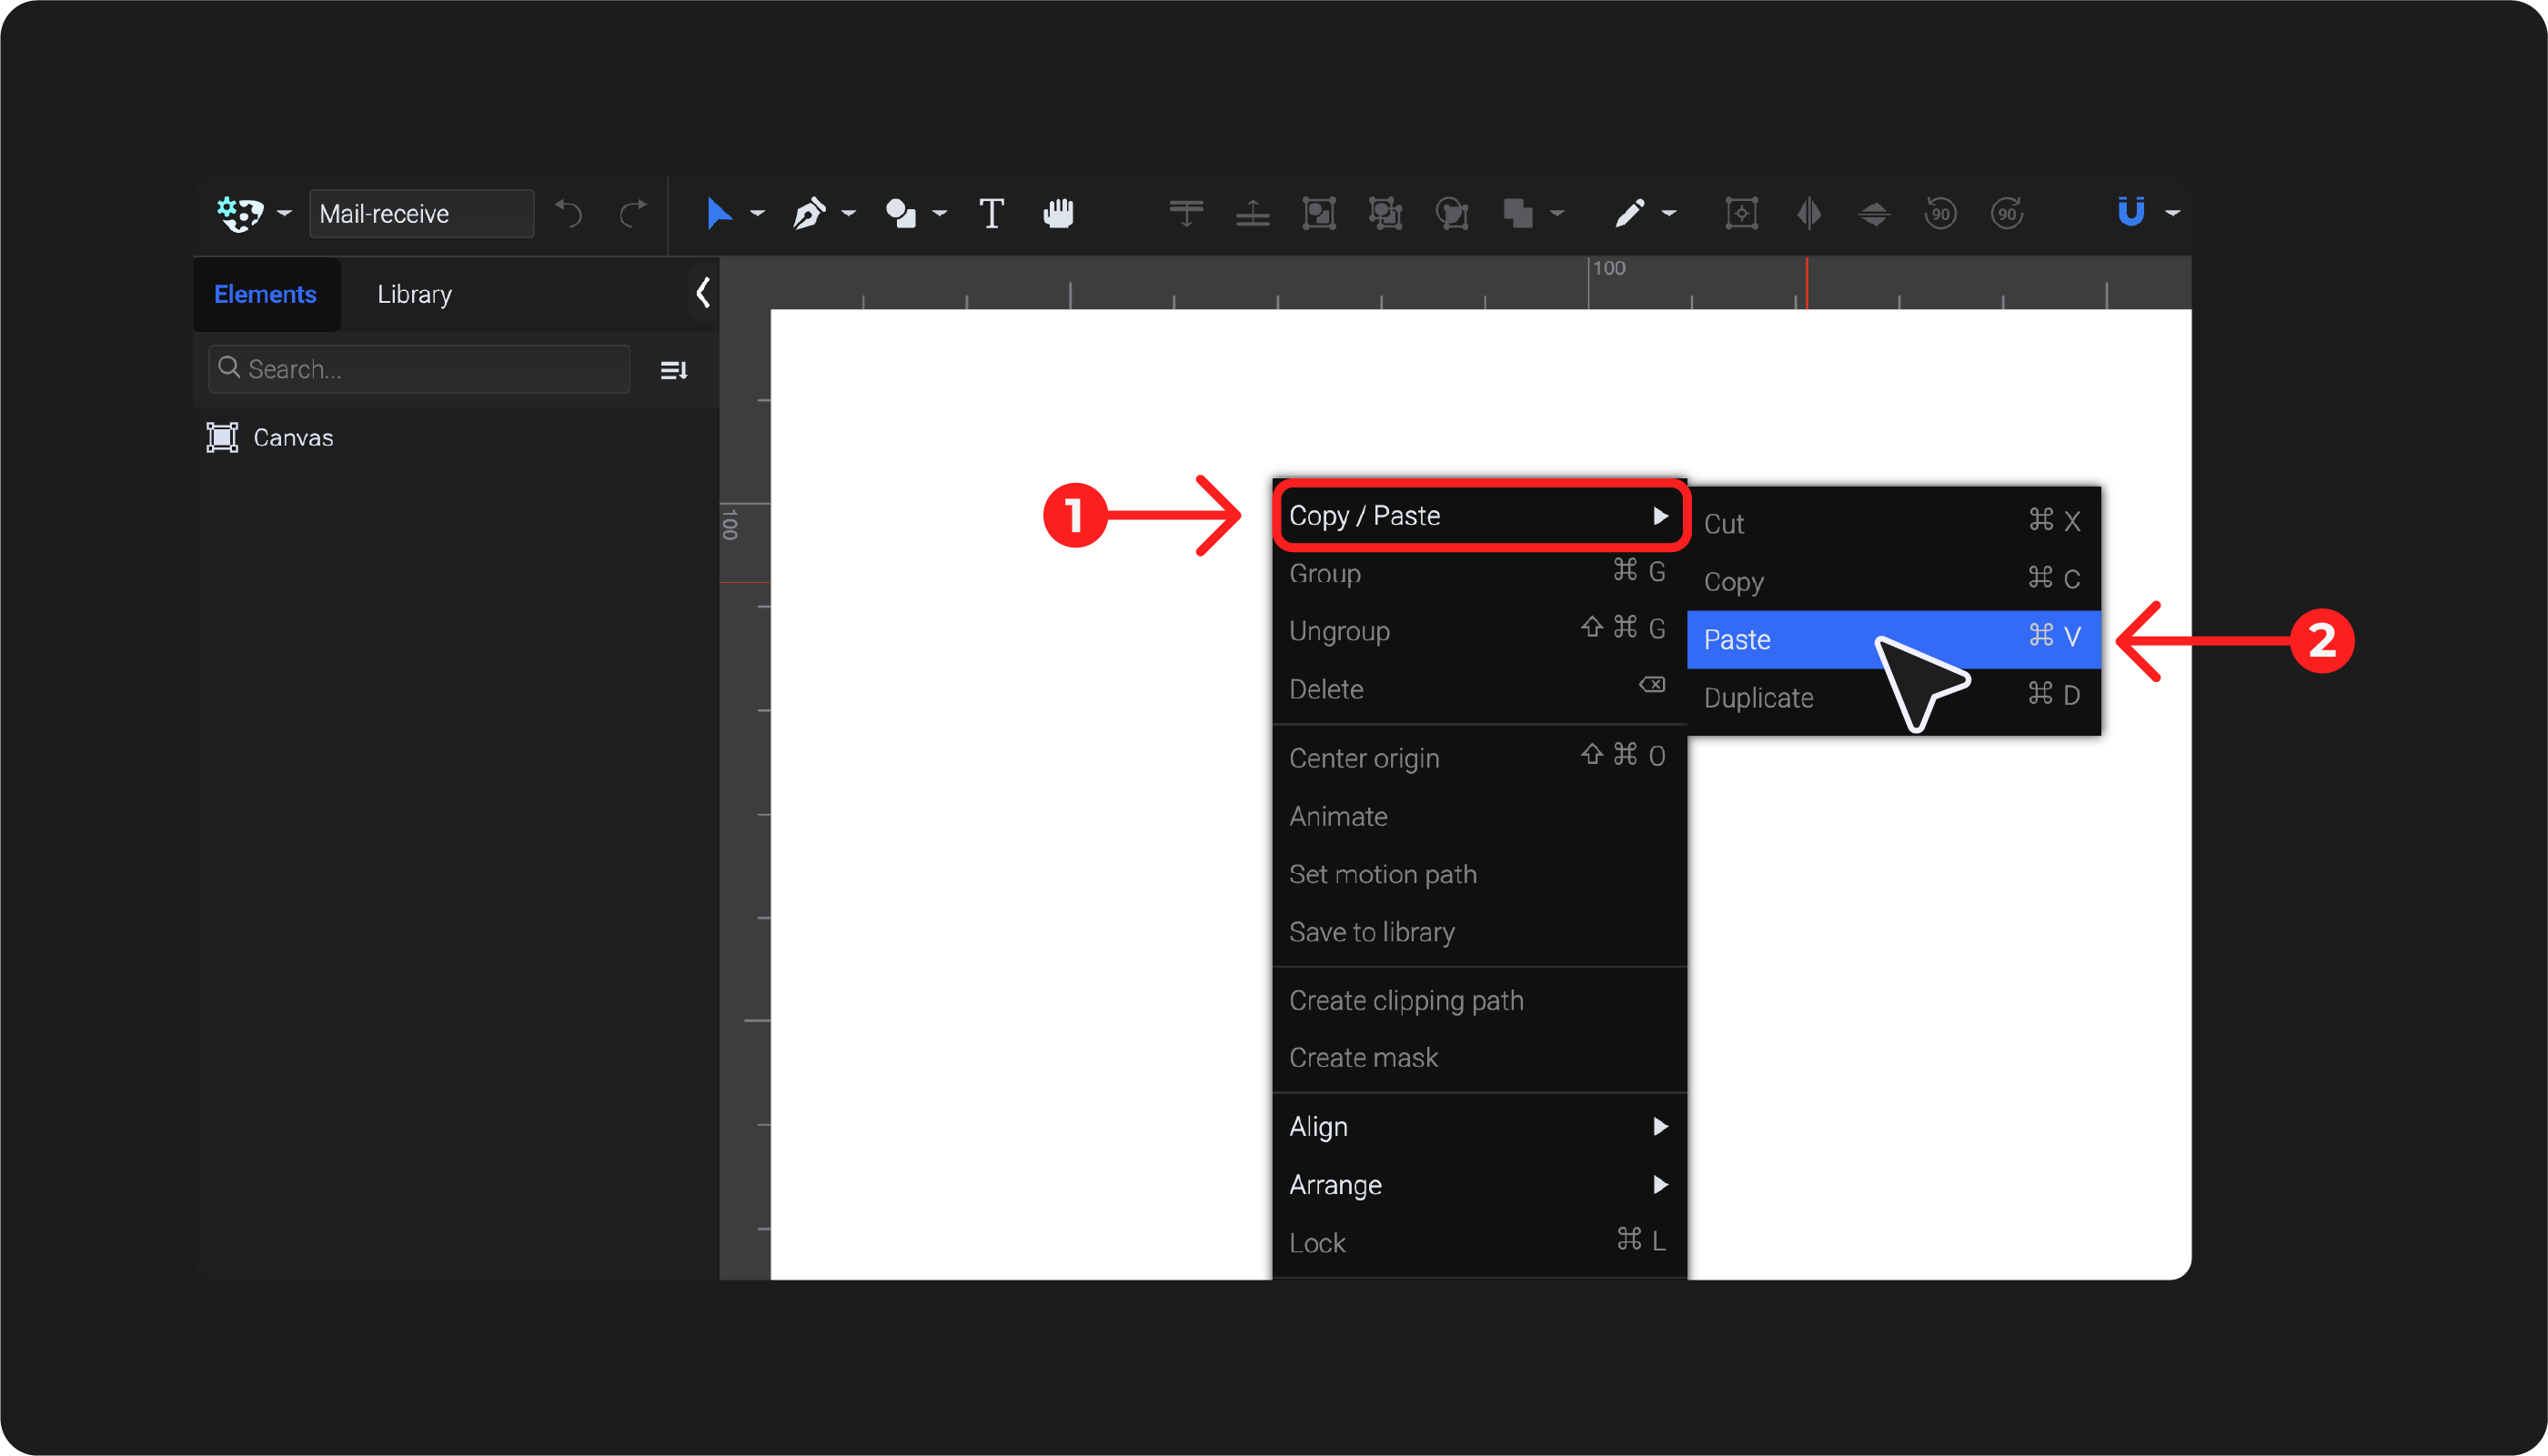
Paste The SVG Into SVGator
Open your SVGator project and paste the design using Cmd/Ctrl + V, or right-click and select Copy/Paste → Paste. Your SVG will be imported instantly and is ready to animate.
You can also copy and paste designs as PNG files, but since PNGs are raster images, they cannot be animated in SVGator.
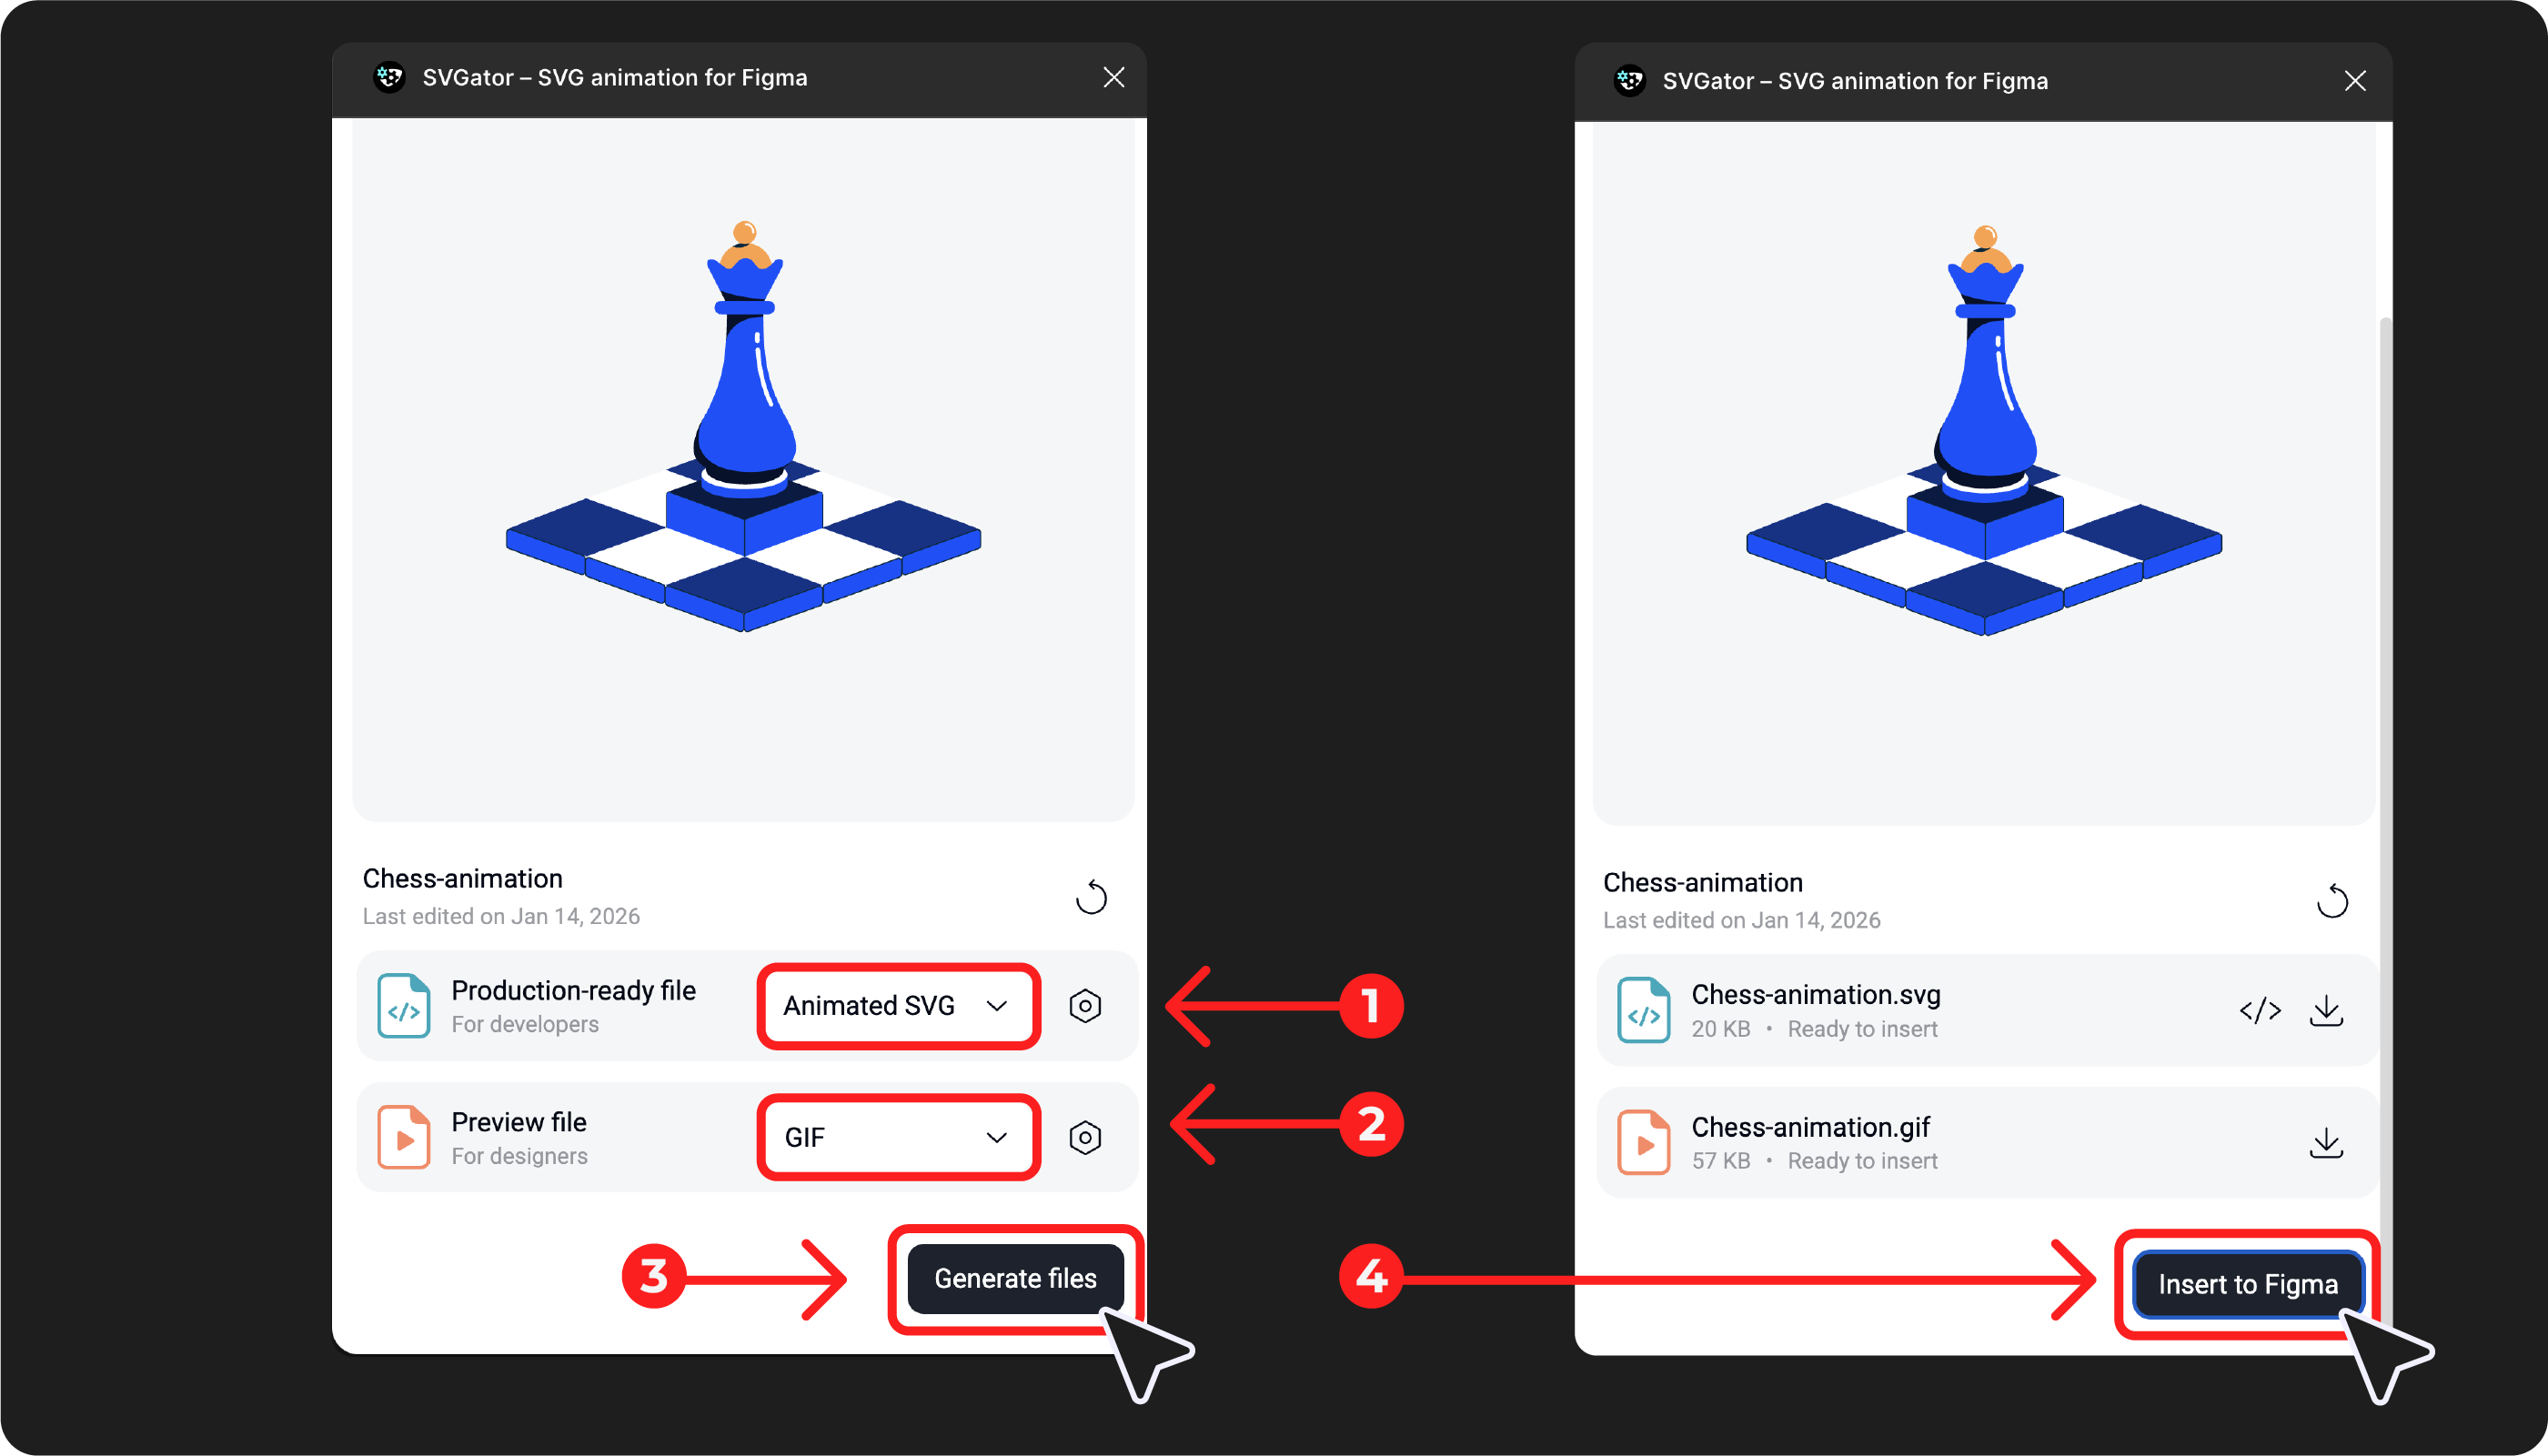
How To Bring Animations To Figma
The workflow typically follows a continuous cycle where designs are created in Figma, animated in SVGator, and then returned to Figma through the plugin. This removes the need for repeated exporting and manual updates.
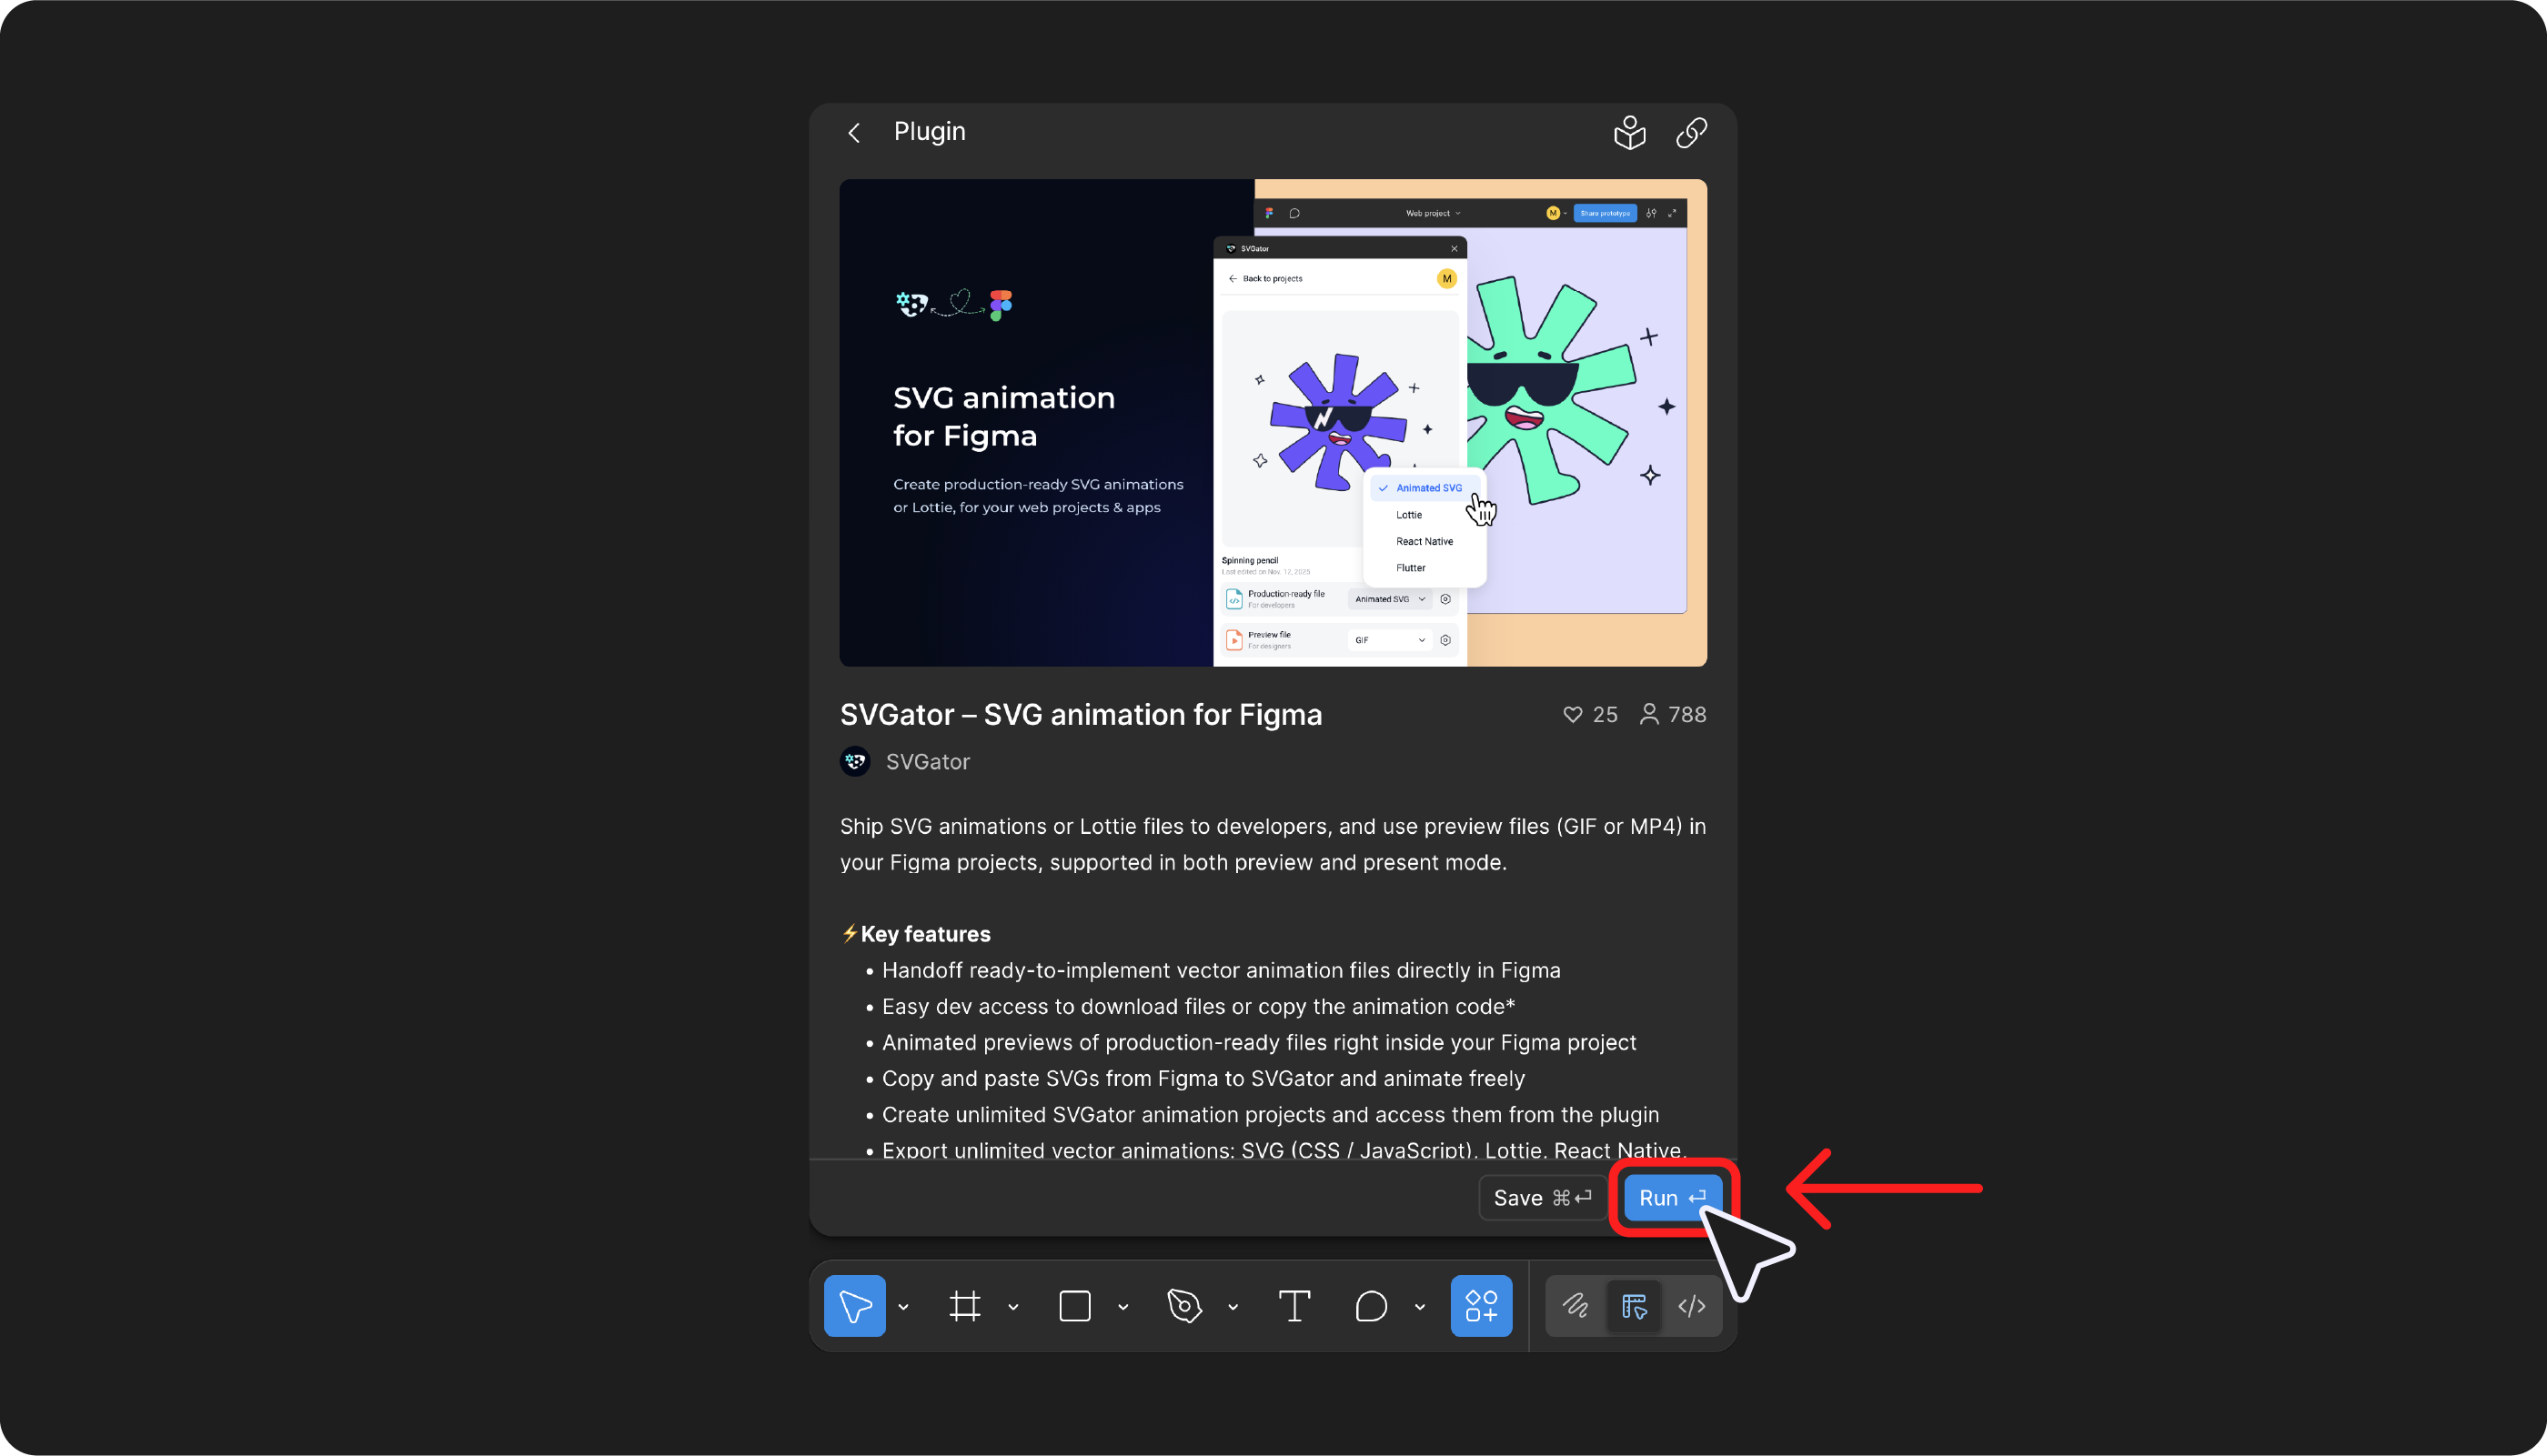
- Open your Figma file and launch the SVGator plugin from the Plugins menu or Actions panel.
- Browse your SVGator projects inside the plugin and select the animation you want to use.
- Choose which type of production-ready file and preview file to generate.
- Insert the animation directly into the Figma canvas.
- After making updates in SVGator, save the animation there and use Refresh in the plugin to load the latest version in Figma.
Generating Preview Files For Designers
Figma does not support animated SVG playback. Static SVGs display correctly, but any animation data is ignored. The SVGator Figma Plugin solves this by generating GIF or MP4 preview files that play directly inside Figma's Preview and Present modes.
Preview files are meant for visual review: prototypes, stakeholder presentations, and design handoffs where the animation needs to be seen in context. They are not meant for production implementation.
| Format | Best for |
| GIF | Loops automatically, no playback controls needed. Better for short, repeating animations like loaders, micro-interactions, and icon animations. |
| MP4 | Smaller file size at higher quality. Better for longer animations, full-screen transitions, and detailed motion with smooth gradients. |
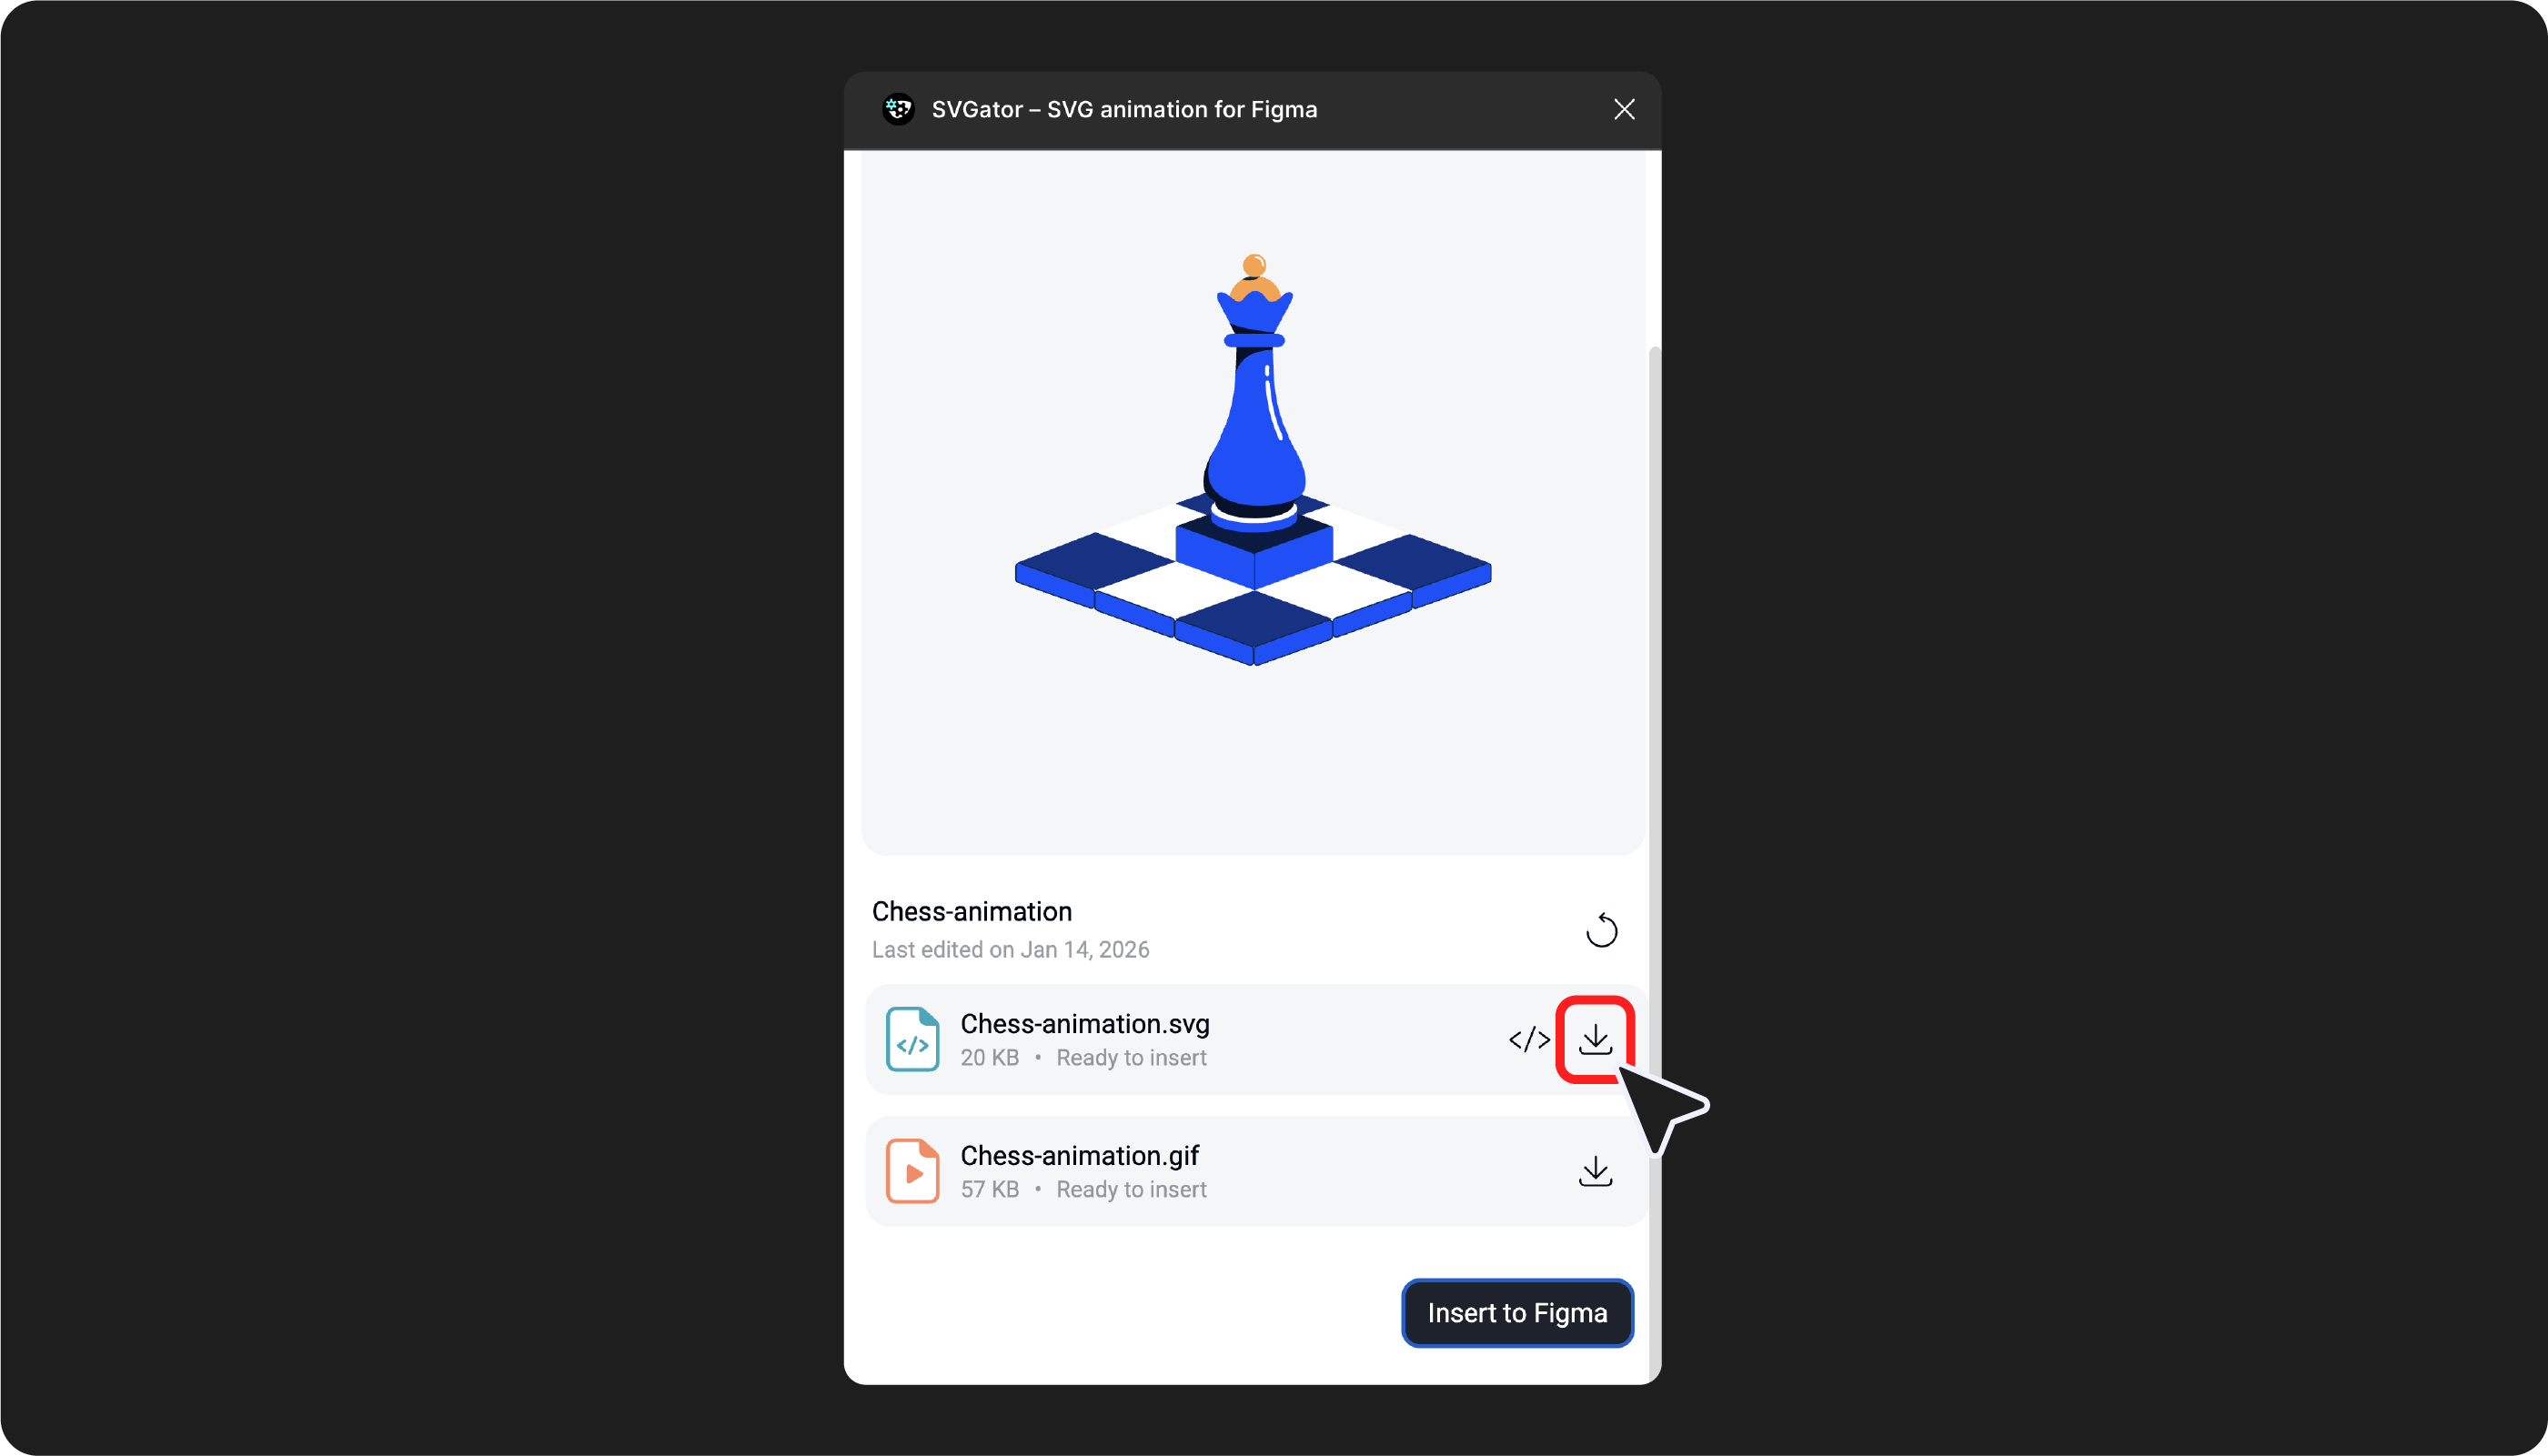
How To Generate A Preview File
Select a project in the plugin → choose Preview file → select GIF, MP4, or both → click Generate files. The rendered file is inserted into the Figma canvas as an image layer.
If you don't want to wait for the GIF or MP4 to render, click Skip & insert to add a static SVG placeholder instead.
Generating Production Files For Developers
Production-ready files are the final animation assets that developers implement in code. The SVGator Figma Plugin supports four production formats: animated SVG, Lottie JSON, React Native, and Flutter.
Selecting the correct export format depends on how and where the animation will be used.
| Format | Best for | File size |
| Animated SVG | Websites, web apps. Single self-contained file with CSS/JS animation. | Very small |
| Lottie JSON | Cross-platform apps. Requires Lottie player library. | Small |
| React Native | React Native mobile apps. SVG via webview component. | Small |
| Flutter | Flutter mobile apps. SVG via webview component. | Small |
How Developers Access Animation Files
Developers can retrieve implementation files directly from Figma without needing access to SVGator itself. Once the plugin is installed, selecting an animation layer within a Figma project allows the production-ready file to be downloaded immediately.
In Dev Mode, developers can open the Plugins tab, run the SVGator plugin, and access the animation already inserted into the design. From there, they can download the required file format or copy the necessary code for implementation. This approach simplifies handoff by keeping design, animation, and development assets aligned within the same project environment.
Common Issues And How To Fix Them
Most issues encountered during the workflow originate from file structure or export settings rather than the animation itself. Understanding the typical causes makes troubleshooting straightforward and prevents repeated corrections later in the process.
| Issue | Cause | Fix |
| Elements missing after import | Hidden layers or unsupported Figma effects | Unhide/remove before export |
| Animation not updating in Figma | Didn't save in SVGator before refreshing | Save → wait 10s → Refresh |
| Unexpected scaling | Viewbox/dimension mismatch | Check frame dimensions match export settings |
| Text not animating properly | Text not outlined | Convert to outlines in Figma |
| Blurry GIF preview | Low resolution settings | Increase GIF resolution in export options |
| Broken gradients | Complex gradient type | Simplify to linear/radial |
Final Thoughts
Integrating animation into the design workflow becomes significantly more efficient when tools communicate directly with each other. The SVGator Figma Plugin removes unnecessary steps between design, animation, and delivery, allowing teams to maintain consistency while reducing manual effort. For teams working with animation inside Figma, SVGator provides a practical and reliable solution for creating and delivering production-ready motion assets.
FAQ
Is the SVGator Figma Plugin free?
Yes. The plugin can be installed at no cost and works with any SVGator account, including free plans. Developers with Edit access to a Figma project can download production-ready files without having an SVGator account.
Can I preview animations directly inside Figma?
Figma does not support playback of animated SVG files. The plugin’s Preview file option generates GIF or MP4 files that play in Preview and Present modes.
What’s the difference between Production-ready file and Preview file in the plugin?
Production-ready files such as SVG, Lottie, React Native, or Flutter exports are intended for implementation in code. Preview files in GIF or MP4 format are designed for visual review within prototypes and presentations (compatible with Present mode and Preview mode).