How to Animate Colors and Gradients
Duration: 03:07
In this tutorial you can learn how to animate colors and gradients.
Creating color transitions is a simple and effective way to animate gradients. Below you will find a step-by-step guide to animate gradients on a chameleon illustration, creating smooth transitions and dynamic effects.
Step 1 - Start with the Blue Shape
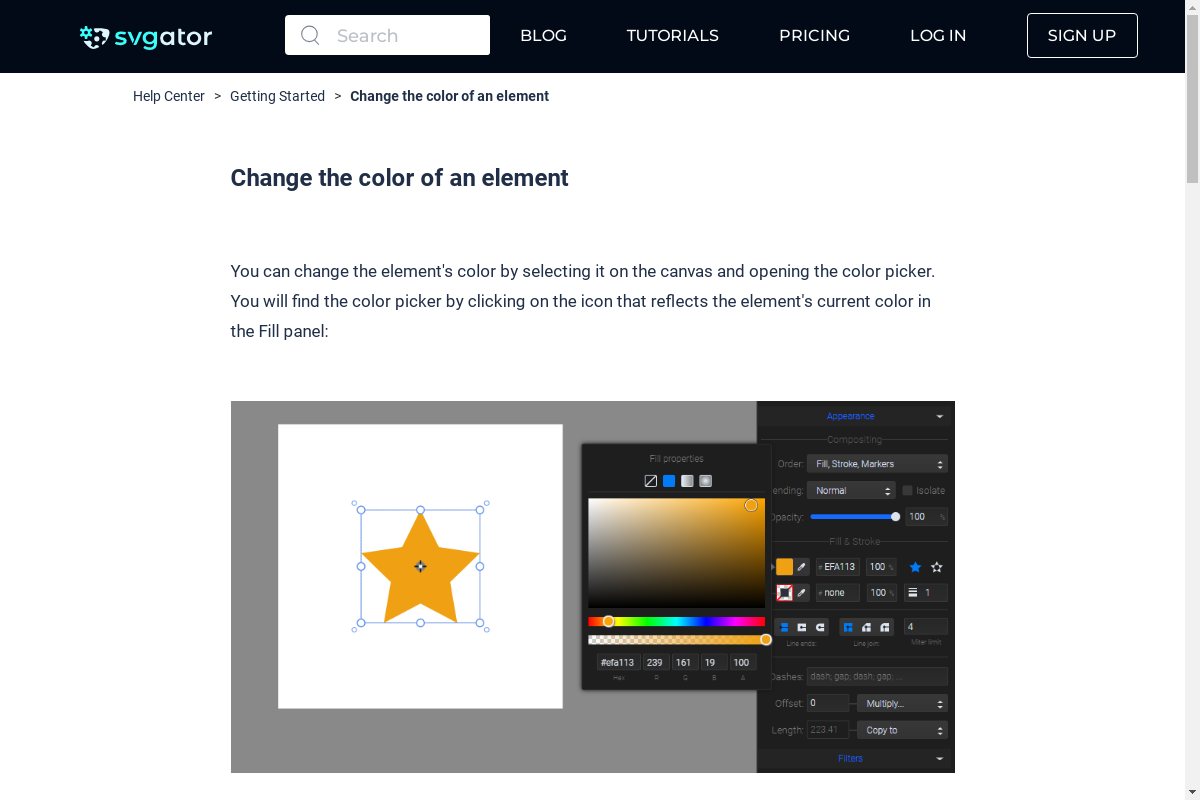
Select the blue shape on the canvas.
Go to the color properties panel, click on the fill color, and choose "Linear Gradient".
Adjust the orientation of the gradient by dragging its endpoints on the canvas.
Step 2 - Adjust Gradient Colors
From the color selector panel, choose a color for each gradient point.
For the first point, select a warm pink color that complements the chameleon's initial color scheme.
Step 3 - Add a Third Color Point
To add a third color point, hold down the Alt or Option key and click on the gradient bar.
The third color point will appear in the panel. Adjust its position and select a color, such as yellow for the middle point and pale red for the third point.
Step 4 - Set Gradient Colors for Other Shapes
Repeat the process for the next shape: select the linear gradient and adjust the endpoints.
Add colors to the gradient points as desired, ensuring they blend well with the first shape.
Step 5 - Animate the Gradient
With the shape selected, go to the animator list and choose "Fill Color".
Move the playhead to 1.5 seconds on the timeline and add a second keyframe.
Change the gradient properties from the color selector. For instance, change the first color point to a light, glowy green, replace the orange with a nice purple, and choose a neon turquoise for the middle point.
Move the middle point closer to the chameleon's head and scale the gradient by dragging the endpoint further away.
Step 6 - Record Changes in Keyframes
The changes made are recorded in the second keyframe, creating a smooth transition between the gradient colors.
Set a third keyframe at the end of the timeline by duplicating the first one (press Command D on the keyboard). This ensures the gradient returns to its initial state, resulting in a smooth loop animation.
Step 7 - Animate Other Shapes
For another shape, choose "Fill Color" again and move the playhead to 1.5 seconds to apply changes to the gradient.
To create a simple color swap, click on the "Reverse" button.
Duplicate the first keyframe at the third second to complete the transition.
Play through the animation to ensure all transitions are smooth and the gradients change as intended.
Fine-tune any remaining details, such as the position of gradient points and the colors, to enhance the overall animation quality.
Tips for Better Results
Consistency: Ensure that the gradient transitions smoothly by carefully selecting colors that blend well together.
Precision: Use the snapping option and the grid for precise adjustments of gradient points and endpoints.
Experimentation: Don't be afraid to experiment with different colors and gradient positions to achieve the desired effect.
Still have questions? Send us an email to contact@svgator.com and we will get back to you as soon as we can!
Related tutorials to help you out: